这是本节的多页打印视图。
点击此处打印.
返回本页常规视图.
产品手册
本文档提供AISE产品的各项功能的详细说明
产品手册
本文档提供AISE产品的各项功能的详细说明,产品手册按特性组织,针对每个特性进行说明。如果希望通过使用场景来了解产品,可以参考 动手实验。
AISE系统概述
AISE (AI Powered Software Engineering) 系统定位于企业AI应用基座,为企业引入大模型能力并在各业务环境引入AI赋能场景提供基础支撑。通过提供一系列企业AI应用必须的基础设施,AISE可以降低企业引入大模型的技术门槛和运维复杂度。
AISE提供企业引入大模型能力的 产品+培训+咨询服务 的 一体化解决方案,提供从产品实施、推广运营、大模型训练和微调、大模型应用开发的一系列定制化解决方案,确保企业可以真正将大模型的能力应用到各个业务环节。
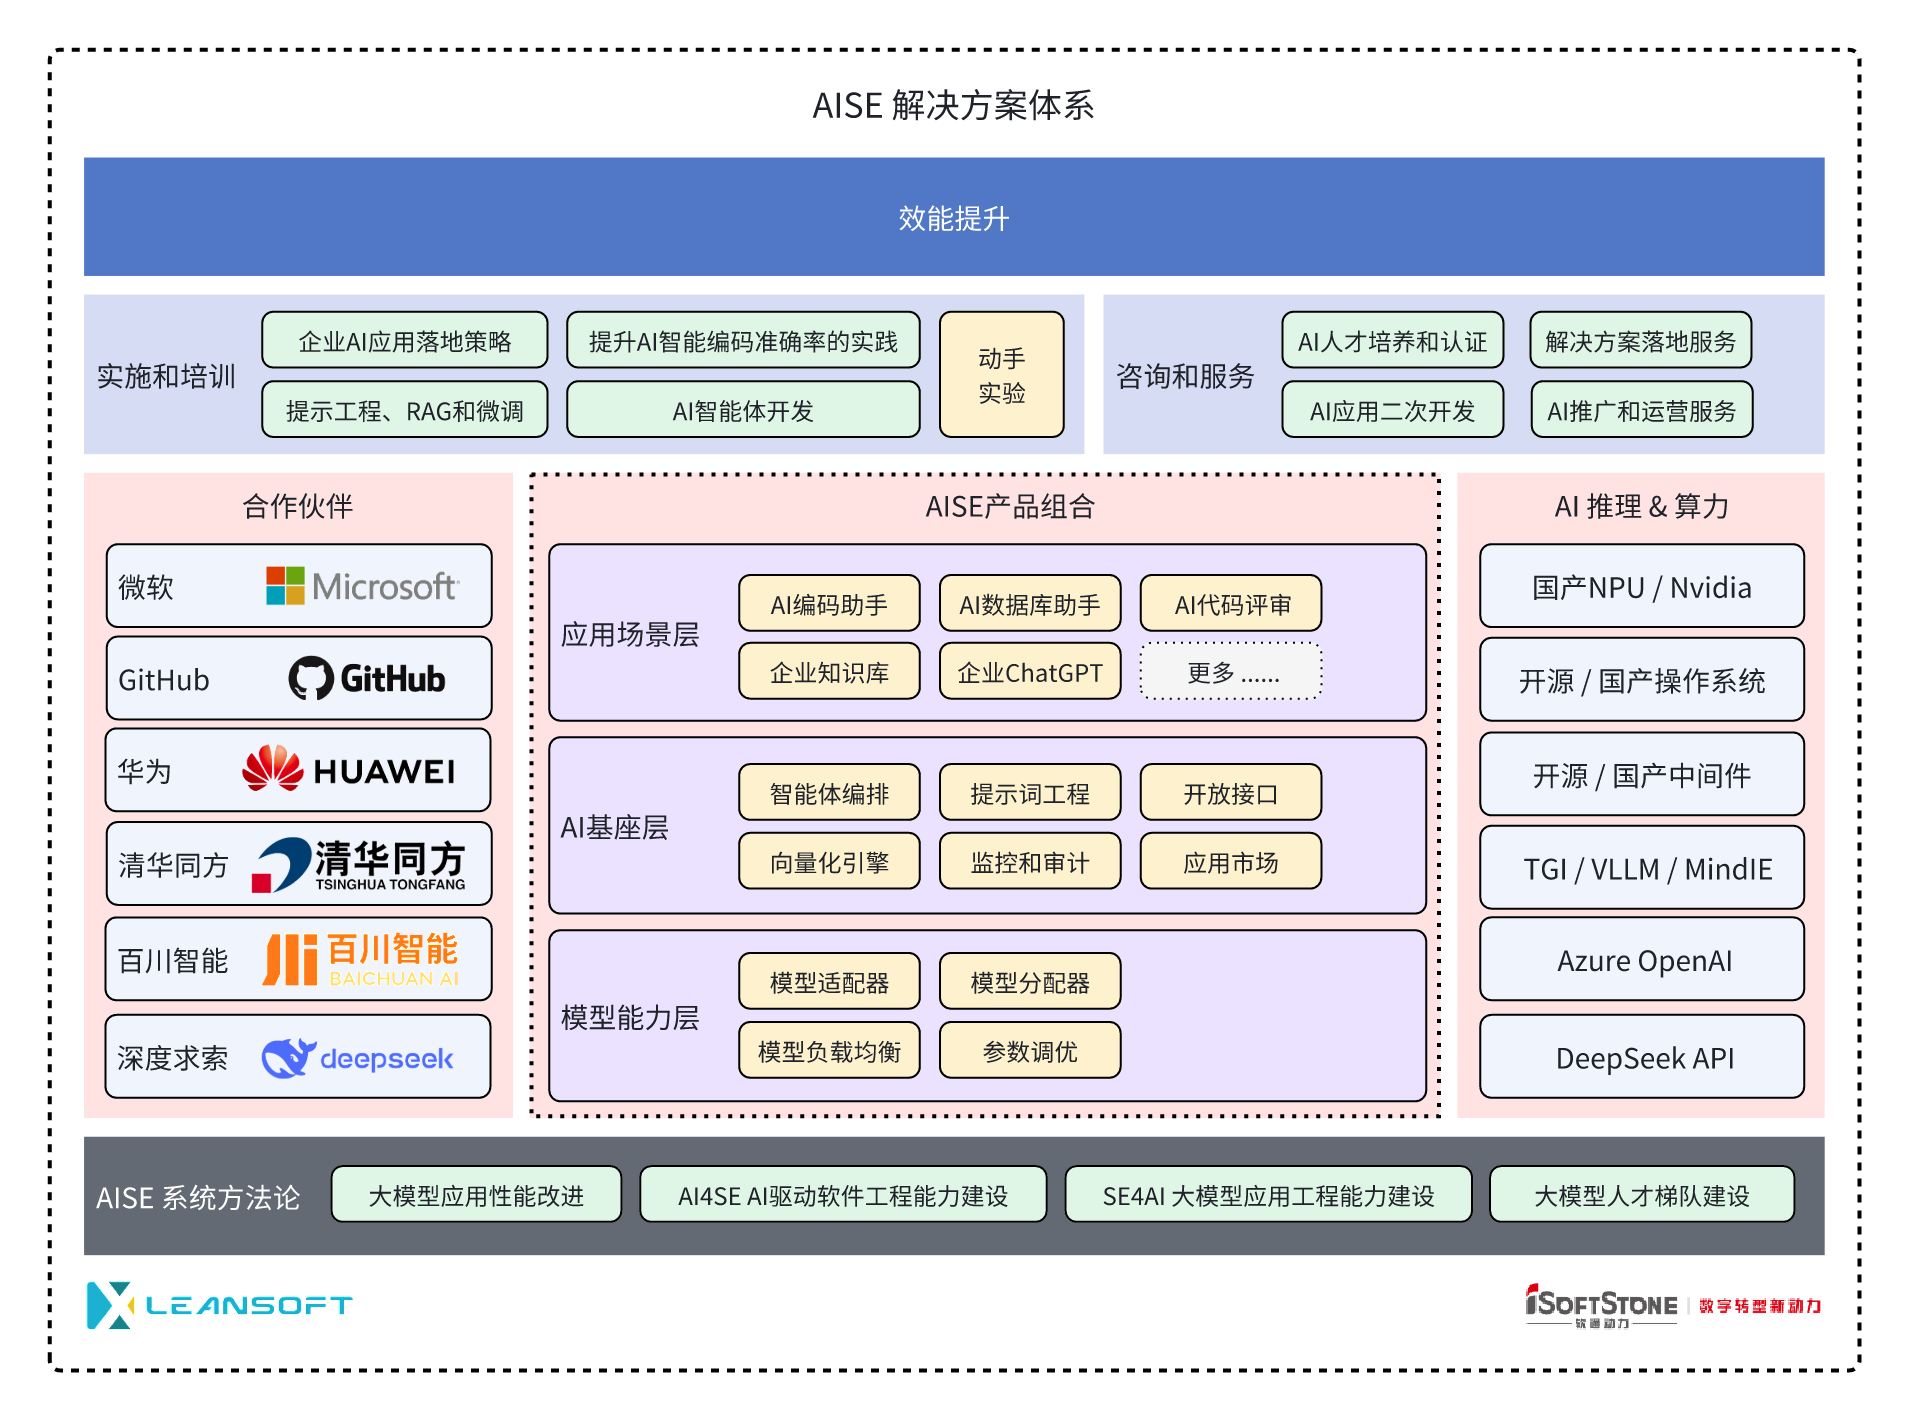
AISE的AI基座内置 多模型适配、提示工程、知识库和应用市场 等模块,为企业接入大模型并向各个组织单位输出模型能力提供了完整的基础支撑能力。我们同时对所有的大模型调用提供全链路的监控和审计能力,所有模型请求均在后台记录并持久化存储,可以用于生成效能看板、实施安全审计或者其他数据分析,帮助企业把控大模型实施效果,准确客观评价投资收益。最后,AI基座层的所有能力均提供标准化的接口(API),方便企业在AISE的基础上开发各类AI应用,将大模型能力引入到企业各个环节。
基于以上设计,AISE系统从架构上不同于市场上的AI编码助手类工具,提供了企业落地AI应用的各项基础能力、以及更好的扩展性和开放性。
| # |
能力 |
说明 |
| 1 |
多模型适配 |
企业的大模型战略需要适应市场的快速变化,确保引入到企业的模型可以灵活的适配各种场景,并且可以满足企业内部复杂组织架构、权限、安全性、审计等要求。同时,企业还需要根据内部的个性化需求对模型本身进行适配和调整,因此需要平台具备模型训练,微调以及对模型资产进行版本管理和变更管理的能力。 |
| 2 |
提示工程支持 |
提示工程是企业构建AI应用的核心实践,提示词是AI驱动下企业的核心资产。本模块通过多层提示词的设计以及对提示词的访问控制、以及灵活的提示词组织和调用能力为企业提供简单易用的自助化提示工程能力。 |
| 3 |
应用市场 |
为承载企业多样的AI应用并为这些应用提供基础的版本分发、升级和场景化管理,AISE内置了应用市场管理。 |
| 4 |
数据持久化和审计 |
用户通过AISE系统与大模型的对话操作均会通过会话数据持久化继续保存,并允许管理员对这些数据的保存周期进行设置。满足企业的数据安全和审计要求。 |
| 5 |
数据遥测和效能仪表盘 |
AISE内置数据遥测接口,并允许应用开发者对数据埋点进行自定义操作,而无需对遥测接口进行变更;基于这些数据AISE内置效能仪表盘,并提供按组织单位进行数据维度切分展示的能力。内置的指标包括:活跃用户、代码生成次数、对话次数、模型接入数量、模型调用次数、知识库文档数量、代码生成行数、代码接受行数和代码接受率等指标。 |
| 6 |
用户和角色管理 |
内置用户和角色管理能力,并支持用户的部门分配和角色分配。 |
| 7 |
统一身份认证系统 |
将AISE门户登录页面用作所有AISE应用程序和插件的中央身份验证点,为用户提供熟悉且简化的登录体验,消除了需要为每个单独的应用程序重复输入密码的需求;通过标准化OAuth2集成企业现有身份认证系统。 |
| 8 |
知识库基础支撑系统 |
AISE内置向量数据库和知识库管理组件,支持企业通过集成多种数据源构建私有知识库,并允许用户对多个知识库的数据源进行组合查询和内容生成。 |
| 9 |
特性开关和灰度发布 |
AISE内置特性开关管理,并允许管理员根据用户或者组织单位开放,部分开放和全部开放某些特性。特性开关能力方便企业在尝试新的AI应用/场景过程中保持成熟应用的正常运营。 |
AISE内置一系列开箱即用的AI应用,为企业提供立竿见影的大模型应用效果。当前内置的应用包括:
- SmartCode 企业级AI编码助手,提供自动代码补全,代码对话等常用AI编码场景支持
- SmartChat 企业级ChatGPT AI通用助理,提供基于浏览器的通用ChatGPT服务
1 - AISE服务基座
AISE服务基座为企业引入AI大模型能力提供一系列基础能力,包括模多模型适配器、提示词仓库、向量引擎和向量数据库、AI代理(Agent)编排和运行引擎等。通过AISE服务基座,企业可以快速引入AI大模型能力,实现业务场景的智能化升级。
1.1 - 用户登陆
支持普通的帐号密码登陆和sso等第三方的登陆。企业管理员使用内置管理帐号 aise-admin登陆。
用户登陆
支持普通的帐号密码登陆和sso等第三方的登陆。企业管理员使用内置管理帐号 aise-admin登陆。另外aise还内置了一个普通用户:aise-user, 在刚部署完成后可以使用此帐号登陆。

1.2 - 用户、部门和角色管理
为了进行更好的权限管理以及分组,可以将企业的组织架构映射到AISE的部门和用户组中,并可以根据用户、部门、用户组配置对应的权限。
1. 创建用户
管理员需要在AISE的管理端创建用户,并分配给用户账号密码。
- 点击系统管理 | 用户管理 | 新增

- 输入用户昵称、用户账号、归属部门以及密码。

2. 创建部门
为了进行更好的权限管理以及分组,可以将企业的组织架构映射到AISE的部门中,并可以根据部门配置对应的权限。
-
点击系统管理 | 部门管理 | 添加部门

-
输入上级部门,部门名称

3. 用户管理
内置用户和角色管理能力,并支持用户的部门分配和角色分配。

4. 用户组管理
为了进行更好的权限管理以及分组,可以将企业的组织架构映射到AISE的用户组中,并可以根据用户组配置对应的权限。
- 点击系统管理|用户组管理|新增

- 输入用户组名称、Azure用户组Id(Azure Group ID,选输)及备注

- 点击系统管理|用户组管理|用户组名称

- 选择用户,点击确认按钮,关联用户成功

- 用户组访问权限配置
- AISE管理|模型适配器|修改

- 选择访问范围和用户组

用户组除了在AISE系统新增外,用户通过Oatuh2登录时,也会同步用户的组信息到AIS系统中,如果用户已创建过auzre用户组,则直接关联到当前组中。
同步azure用户组必须有Team.ReadBasic.All权限。
1.3 - 统一身份认证
AISE门户登录页面用作所有AISE应用程序和插件的中央身份验证点,为用户提供熟悉且简化的登录体验,消除了需要为每个单独的应用程序重复输入密码的需求;通过标准化OAuth2集成企业现有身份认证系统。
将AISE门户登录页面用作所有AISE应用程序和插件的中央身份验证点,为用户提供熟悉且简化的登录体验,消除了需要为每个单独的应用程序重复输入密码的需求;通过标准化OAuth2集成企业现有身份认证系统。

1.4 - 模型适配器
AISE的模型能力层具备模型训练,微调以及对模型资产进行版本管理和变更管理的能力,确保可以为企业的大模型战略提供完整支撑
1. 基本模型能力
当前市场上的各类大模型层出不穷,企业的大模型战略需要适应市场的快速变化,确保引入到企业的模型可以灵活的适配各种场景,并且可以满足企业内部复杂组织架构、权限、安全性、审计等要求。同时,企业还需要根据内部的个性化需求对模型本身进行适配和调整,因此需要平台具备模型训练,微调以及对模型资产进行版本管理和变更管理的能力。
AISE的模型能力层提供以下能力,确保可以为企业的大模型战略提供完整支撑
-
多厂商适配:内置对市场主流大模型厂商的介入支撑,包括:微软Azure OpenAI, DeepSeek深度求索,Llama,HuggineFace,阿里通义大模型,华为和百川智能 。
-
SaaS服务和私有部署支持:支持通过SaaS API和私有部署方式介入以上厂商的大模型服务。
-
推理服务通用接口支持:支持通过VLLM,TGI和OpenAI标准接口提供的推理服务 。
-
英伟达Nvidia GPU支持:用户可以选择Nvidia A100,A800,A10,L20以及4090系列GPU作为私有部署的硬件算力。
-
国产华为晟腾系列NPU:用户可以选择晟腾系列NPU作为私有部署硬件算力,包括:晟腾910A/B系列,晟腾310系列;并支持多卡并行推理配置。
-
参数可视化配置:支持对模型常用参数进行可视化配置,用户管理员可以通过模型适配器界面完成模型参数的配置,内置标准化参数支持和个性化参数注入。
-
多实例负载均衡:用户可以为同一个模型实例添加多个子实例,AISE模型适配器自动针对多个子实例提供流量分配,为用户提供模型实例的横向扩展能力。
-
模型路由能力:支持按模型类型、按组织单位、按应用场景进行模型路由分配 。
-
组织架构路由:支持针对不同部门提供不同的模型实例,支持在统一场景下为不同组织单位提供不同的模型路由,比如:同样是代码补全服务,可以为不同开发小组分配不同的代码补全模型。
-
按场景进行模型路由:针对代码补全、代码对话、通用代码任务,如:代码解释、代码纠错,代码评审、单元测试 生成等不同任务提供不同的模型路由。
-
增强型模型密钥验证能力:在使用Azure OpenAI的模型服务时,支持通过Service Principle的方式进行服务端身份验证,并动态获取模型密钥(access token),此密钥在一定时间内自动过期,提供更高的安全性和企业可管理性。
-
支持在固定代码任务中使用FIM模式:FIM(Fill in the Middle)是一种特殊的生成模式,通过对前文和后文的同时推理提供更优化的模型生成控制,一般用户代码生成任务。AISE不仅代码生成任务上提供FIM能力,同时也支持在通用代码任务(代码解释、代码纠错,代码评审、单元测试)上使用FIM能力。
模型支持列表
AISE模型适配器内置对以下厂商和模型提供开箱即用的接入能力。
| # |
提供商 |
商用 / 开源 |
接入方式 |
模型名称 |
备注 |
| 1 |
微软 |
商用 |
SaaS API |
GPT 3.5 Turbo |
|
|
|
|
|
GPT 3.5 Turbo 16K |
|
|
|
|
|
GPT 3.5 Turbo Instruct |
|
|
|
|
|
GPT 4.0 |
|
|
|
|
|
GPT 4.0 32K |
|
|
|
|
|
GPT 4.0 128K |
|
|
|
|
|
GPT 4o |
多模态支持 |
|
|
|
|
GPT 4o mini |
多模态支持 |
|
|
|
|
text-davinci-003 |
|
|
|
|
|
text-embedding-ada-002 |
|
|
|
|
|
text-embedding-3 |
|
| 2 |
深度求索 |
商用 |
SaaS API |
DeepSeek Coder |
|
|
|
|
|
DeepSeek Chat |
|
|
|
|
|
DeepSeek v2 Coder |
|
|
|
|
|
DeepSeek v2 |
|
| 3 |
深度求索 |
开源 |
私有部署 |
DeepSeek Coder 6.7 Base |
晟腾/英伟达 |
|
|
|
|
DeepSeek Chat 6.7 Instruct |
晟腾/英伟达 |
|
|
|
|
DeepSeek Coder 33B Base |
晟腾/英伟达 |
|
|
|
|
DeepSeek Chat 33B Instruct |
晟腾/英伟达 |
| 4 |
阿里巴巴 |
开源 |
私有部署 |
Qwen1.5 72B |
晟腾/英伟达 |
|
|
|
|
Qwen1.5 72B |
晟腾/英伟达 |
| 5 |
微软 |
开源 |
私有部署 |
WizardCoder15B |
英伟达 |
| 6 |
Jinna |
开源 |
私有部署 |
jina-embeddings-v2-base-zh |
|
|
|
|
|
jina-embeddings-v2-base-code |
|
2. 模型全局配置
模型配置完成后,需要对AISE进行模型全局配置,来配置智能对话中可以使用的模型,代码补全中可以使用的模型,向量化模型等等。
-
点击系统管理 |参数设置 | 找到参数名称为“全局配置-模型” 的参数

-
修改配置,配置如下:

详细介绍:
  "chat_model_types":[
      "completion_azure_gpt",
      "completion_azure_gpt35_16k",
      "completion_azure_gpt4",
      "completion_azure_gpt4_32k",
      "completion_azure_gpt4_128k",
      "completion_deepseek_chat"
    ],
  "embedding_model_type":   "embedding_azure_text-embedding-ada-002",
  "code_completion_model_types": [
      "codecompletion_azure_text-davinci-003"
    ],
  "task_configuration":{
      "chat_model":{
          "use_current_chat_model":"false",
          "task_method_chat_model_type":"completion_azure_gpt35_16k"
        },
      "completion_model":{
        "task_method_completion_model_type":"completion_azure_text-davinci-003"
        }
    }
}
参数说明
| 参数 |
说明 |
| chat_model_types |
代码对话可以使用的模型列表 |
| embedding_model_type |
指定向量化模型 |
| code_completion_model_types |
指定代码补全模型 |
| task_method_chat_model_type |
指定提示词模版为对话类型时使用的模型 |
| task_method_completion_model_type |
指定提示词模版为完成类型时使用的模型 |
3. 添加模型
将企业内选型的模型通过模型适配器,添加到AISE中,并在具体的AI应用场景中使用这些模型。添加方式如下:
-
点击AISE管理 | 模型适配器

-
输入模型标识 | 模型类型 | 模型参数 | 配置项

| 参数 |
|
| 模型类型 |
下拉列表选择 |
| 模型参数 |
{“temperature”:“0.7”,“max_tokens”:“800”,“top_p”:“0.95”,“frequency_penalty”:“0”,“presence_penalty”:“0”,“stop”:"",“chunk_size”:""} |
| 配置项 |
{“API_KEY”: “”,“ServiceEndPoint”: “”,“ApiVersion”: “2023-03-15-preview”,“deploymentName”: “”} |
4. 启用多实例
通过启用多实例的方式来对流量进行不同模型实例的分发,适用于用户量比较大的企业
- 启用 “是否有实例”

- 点击添加配置项

- 输入其他实例配置项信息

5. 模型权限配置
对模型进行访问权限控制,支持公开模型,以及按部门划分模型访问权限。


1.4.1 - Qwen2.5模型适配
Qwen2.5模型适配
特性说明
orch服务增加对Qwen2.5模型的适配,适配后,通过配置,可用Qwen2.5模型进行chat对话,代码补全,提示词。
操作指引
新增模型类型 用途说明
-
completion_qwen_chat
用途:适用于提供对话能力的模型
适用模型:qwen2.5-14b、qwen2.5-72b-instruct、Qwen2.5_Coder_32B_Instruct
-
codecompletion_qwen_coder
用途:适用于提供代码补全能力的模型
适用模型:qwen2.5-14b、qwen2.5-72b-instruct、Qwen2.5_Coder_32B_Instruct
-
completion_qwen_completion
用途:适用于对完成模式提示词进行解释的模型
适用模型:qwen2.5-14b、qwen2.5-72b-instruct、Qwen2.5_Coder_32B_Instruct
配置模型适配器
-
新增模型适配器时的参数说明:
1.1 模型适配器参数说明
| 参数名称 |
示例数据 |
取值范围 |
说明 |
| 模型标识 |
Qwen2.5_72B_Chat_Saas |
任意字符串 |
模型唯一标识 |
| 模型名称 |
Qwen2.5 72B Saas |
任意字符串 |
模型对外展示的名称 |
| 模型关键字 |
Chat |
Chat/Completion |
标记模型是对话能力还是补全能力 |
| 模型版本 |
2.5 |
任意字符串 |
部署模型的版本 |
| 模型类型 |
completion_qwen_chat |
模型类型列表数据 |
参照 新增模型类型用途说明 |
| 状态 |
有效 |
有效/无效 |
模型是否可用 |
| 访问范围 |
公开 |
公开/部门 |
模型设置访问权限 |
| 模型参数 |
{“repetition_penalty”:1, “temperature”:0.2, “max_tokens”:800, “top_p”:0.95, “token_limit”:8192, “token_limit_safebuffer”:200} |
JSON格式 |
详见 1.2 模型参数说明,模型的默认参数配置。 |
| 配置项 |
{ “API_KEY”: “sk-123456”, “ServiceEndPoint”: “”, “ApiVersion”: “”, “deploymentName”:“qwen2.5-14b”} |
JSON格式 |
详见 1.3 配置项参数说明,模型的基本信息配置 |
1.2 模型参数说明
| 参数名称 |
默认取值 |
取值范围 |
说明 |
| temperature |
0.2 |
[0, 2) |
用于控制模型回复的随机性和多样性。 |
| max_tokens |
800 |
小于模型输出最大长度 |
指定模型可生成的最大token个数。 |
| presence_penalty |
0 |
[-2.0, 2.0] |
用于控制模型生成时整个序列中的重复度。 |
| top_p |
0.95 |
(0,1.0) |
生成过程中的核采样方法概率阈值。 |
| token_limit |
10240 |
与模型相关 |
配置最大token数,一般与模型相关。 |
| token_limit_safebuffer |
200 |
200 |
token最大安全缓冲区。 |
| stop |
- |
- |
stop参数用于实现内容生成过程的精确控制,在模型生成的内容即将包含指定的字符串或token_id时自动停止。 |
1.3 配置项参数说明
| 参数名称 |
示例数据 |
说明 |
| API_KEY |
sk-123456 |
apikey,用于访问接口的权限验证。 |
| ServiceEndPoint |
https://ip:port/compatible-mode/v1/chat/completions |
模型请求地址 |
| API_TYPE |
TGI |
N卡环境默认为VLLM,昇腾为TGI,不配置默认为VLLM。 |
| ApiVersion |
- |
VLLM |
| deploymentName |
qwen2.5-14b |
模型名称 |
-
新增对话模型。
需要在模型适配器中增加Qwen2.5_14B_Chat(N卡环境)/Qwen2.5_32B_Chat_TGI(昇腾环境)/Qwen2.5_72B_Chat_Saas(SaaS版)模型,并确保模型类型指定为:completion_qwen_chat


-
新增代码补全模型。
需要在模型适配器中增加Qwen2.5_14B_Coder(N卡)/Qwen2.5_32B_Coder_TGI(昇腾)模型,并确保模型类型指定为:codecompletion_qwen_coder


-
新增提示词推理模型。
需要在模型适配器中增加Qwen2.5_14B_Completion(N卡)/Qwen2.5_32B_Completion_TGI(昇腾)模型,并确保模型类型指定为:completion_qwen_completion


配置 全局配置-模型
-
配置全局配置-模型
点击系统管理/参数设置 菜单,找到全局配置-模型

-
chat对话配置Qwen2.5
点击修改,在 “chat_model_types”:配置内容增加"completion_qwen_chat" 。此时在对话时的对话模型选择时就可以选择Qwen2.5模型进行对话。


-
代码补全配置Qwen2.5
点击修改, “code_completion_model_types”:配置内容修改为"codecompletion_qwen_coder" 。此时使用SmartCode插件进行代码补全时,就会使用Qwen2.5来完成。

-
提示词配置Qwen2.5
- 点击修改, “task_method_completion_model_type”:配置内容修改为"completion_qwen_completion" 。此时使用完成模式的提示词时,就会使用Qwen2.5 模型来完成。

- 点击修改, “task_method_completion_model_type”:配置内容修改为"completion_qwen_completion" 。此时使用完成模式的提示词时,就会使用Qwen2.5模型来完成。

1.5 - 提示词仓库
提示工程是企业构建AI应用的核心实践,提示词是AI驱动下企业的核心资产。
1. 多级提示词库
提示工程是企业构建AI应用的核心实践,提示词是AI驱动下企业的核心资产。
提示词库
 提示词工厂
提示词工厂

AISE提供了统一的提示词仓库,具备三层提示词结构,包括:

-
系统内置提示词:提供系统内置的高频AI任务相关的提示词版本管理,AISE系统所提供的代码解释,代码评审,注释生成,单元测试生成等内置通用代码任务即通过系统内置提示词提供。系统内置提示词的修改权限不对用户开放,由产品团队根据模型适配和提示工程的迭代随产品版本进行更新。
-
系统基础提示词:系统基础提示词为用户管理员事先配置好并对所有用户开放的提示词,普通用户可以使用此类提示词但是不能对其进行修改。系统基础提示词为企业提供了为用户推送标准化提示词的能力;并且支持按组织单位进行分配。
-
用户提示词:用户可以创建自己的提示词模板,并可以共享给其他用户使用。用户提示词为用户提供了重用提示词的便捷方式,鼓励用户探索AI应用场景并在内部进行共享。
AISE的提示词仓库提供模型适配能力,用户可以针对不同的模型提供不同版本的提示词,系统根据用户调用过程中所使用的模型进行动态匹配,以便确保最佳的提示词生成效果。
AISE所提供的提示词仓库可以通过AISE所提供的标准化接口进行调用,在AISE内置的核心AI应用场景中打通使用,用户可以在SmartCode,SmartChat等不同客户端使用同样的提示词仓库管理体验。
提示词仓库提供内容版本管理,用户对提示词的修改会被记录并允许用户比较和回滚到特定版本。
2. 系统/组织级提示词
管理员可以根据实际的需求创建组织级的的提示词模版,通过创建提示词模版来扩展AI使用场景。
-
点击AISE管理 | 提示词库 | 新增

-
输入提示词标识、简称 、全称 、自然语言、关键词类型、系统目录、用户角色、状态、模版内容等信息。

3. 用户提示词
自定义提示词说明
支持通过模型角色提示词对模型行为进行控制,为不同的用户和应用场景设定不同的大模型行为方式。

自定义提示词示例

在提示词工厂定义提示词斜杠指令为:value2field / 在SmartCode插件中通过斜杠指令调用
创建提示词
-
点击应用 | 提示词工厂

-
点击我的提示词旁边的“创建”按钮

-
这里假设我们创建一个YAMLToJSON的提示词

-
保存后效果如下:

-
回到客户端,输入“/” 召唤出自定义提示词模版,如下图所示:

-
提供一个YAML内容,测试:

-
转换后效果如下:

1.6 - 特性开关
为了能够动态控制某个特性是否对用户开放,允许管理员进行配置。
特性开关也可以帮助我们对大规模的特性重构进行有效的质量控制,在重构过程中保持新特性关闭,如果需要在生产环境测试可以打开开关进行验证。
特性相关代码也使用开关进行分离,避免新特性/重构影响现有的也许逻辑。
1.6.1 - 知识库对话-特性开关
为了能够动态控制某个特性是否对用户开放,允许管理员进行配置。
特性开关也可以帮助我们对大规模的特性重构进行有效的质量控制,在重构过程中保持新特性关闭,如果需要在生产环境测试可以打开开关进行验证。
特性相关代码也使用开关进行分离,避免新特性/重构影响现有的也许逻辑。
特性说明
SmartChat知识库对话功能,需要开启特性开关才能对话。
特性指引
SmartChat知识库对话功能特性开关,开启步骤如下:
- 点击系统管理/参数设置菜单,找到特性开关-chat_library点击修改按钮,弹出参数设置修改窗口,确认特性开关是否开启,若未开启,SmartChat知识库对话功能无法生效。


1.7 - 知识库支撑系统
将多种类型和来源的文档、数据源、代码库组装成知识库,通过数据训练构建出可以直接进行知识检索和问答的知识库。
1.7.1 - 知识库权限管理
新增知识库管理员角色和知识库用户角色,点击应用/应用市场菜单,拥有拥有知识库管理员角色的用户,可以在知识库助手中新增,修改,查询,删除知识库,而拥有拥有知识库用户角色的用户,只能查询知识库。
特性说明
新增知识库管理员角色和知识库用户角色,点击应用/应用市场菜单,拥有知识库管理员角色的用户,可以在知识库助手中新增,修改,查询,删除知识库,而拥有知识库用户角色的用户,只能查询知识库。
操作指引
新增 知识库管理员/知识库用户 角色
-
使用具有管理员角色的用户登录AISE 管理系统,点击系统管理/用户管理菜单,点击以下新增用户按钮;

-
然后系统会弹出新增用户对话框,找到角色下拉菜单;
a.角色下拉菜单选择普通用户和知识库管理员,点击确定,新增成功;

b.角色下拉菜单选择普通用户和知识库用户,点击确定,新增成功;

c.知识库管理员或知识库用户角色不能单独使用,该用户必须具有管理员或普通用户角色
角色的权限展示
知识库用户(查询)
1.从应用市场页面找到知识库助手入口,点击“启用”进入知识库页面。
“知识库用户”角色,只能查询知识库列表,没有对知识库的新增,编辑,删除等权限。


- “知识库用户”角色,有查询知识库详情的权限,但不能编辑和修改。
- 普通知识库

- workspace知识库

知识库管理员(增删改查)
-
“知识库管理员”角色,有知识库相关的所有权限,如列表查询 知识库创建 知识库删除

-
新增普通知识库或workspace知识库

-
普通知识库
- 知识库详情

- 新增普通知识库

-
workspace知识库
- workspace知识库详情

- workspace知识库新增数据源

1.7.2 - 知识库文档对话
知识库助手增加上传文件,训练文件,根据文件进行文档对话功能
特性说明
知识库助手增加上传文件,训练文件,根据文件进行文档对话功能。知识库对话支持的场景有两种:
场景1: 从AI服务基座应用市场的知识库助手选择一个知识库(有训练完成的文档),点击开始对话进入SmartChat开始对话
场景2: 在SmartChat页面自主选择知识库下拉列表开始对话
操作指引
1. 知识库上传文档,点击“开始对话”对该知识库进行问答
a.点击应用/应用市场菜单,打开知识库助手

b.进入知识库详情页面,点击添加数据源

c.类型选择文档类型,点击上传按钮上传文件

d.文件上传成功后,点击确定按钮会将已成功上传的文件保存到该知识库并在后台进行训练

e.文件保存成功后回到知识库详情页面,查看数据源列表的训练状态,只有训练状态为completed的文档才可以进行对话,点击列表右上角的刷新图标可以刷新训练状态

f.点击知识库的开始对话按钮,跳转到smartChat开始对话

g.跳转到smartChat页面后可以基于该知识库文档进行问答


2. 在SmartChat页面自主选择知识库进行问答
a.用户在SmartChat页面新建会话时可以自主选择相关知识库,下拉选数据默认为空。

b.知识库选择完毕之后,用户可以针对当前选中知识库进行文档对话。
1.8 - 应用市场
插件市场是每个AISE部署实例独立可配置,私有部署的实例和公开部署的,不同客户部署的都不相同。
私有部署的插件下载地址也不一样。
允许每个部署的管理员自行配置自己的插件市场。
为承载企业多样的AI应用并为这些应用提供基础的版本分发、升级和场景化管理,AISE内置了应用市场管理。

应用市场通过为每个AI应用分配唯一的app_key的方式,为AISE的其他服务提供针对不同应用提供个性化场景的能力。

1. 创建应用
说明:组织可以在AISE应用市场维护已经开发好的AISE扩展。包括对版本进行维护。方便用户快速获取相关应用。
- 点击AISE管理 | 应用市场管理 | 新增

- 输入应用键、名称、包类型、类型、提供者、标签、选择图标、说明、描述等信息

2. 维护版本
用户可以针对smartcode插件维护版本信息。

-
点击添加

-
输入发布日期、版本号、版本描述、发布者等信息

3. 启用强制更新
为了保障用户可以使用最新的代码补全以及代码聊天插件,AISE管理员可以在后台启用强制更新策略,配置如下。

1.8.1 - 插件上传文件名校验
aise管理 - 应用市场管理页面,在进行插件安装包上传时,增加文件名校验功能
特性说明
aise管理 - 应用市场管理页面,在进行插件安装包上传时,增加文件名校验功能,
规则如下:
- 开头使用英文,可以用 _ 或 - 作为连接符,不能使用空格
- 开头后面紧跟一个主版本号(数字),必须用 _ 或 - 作为连接符
- 主版本号后有一个小数点,再加上次版本号(数字)
- 紧接着一个点加上构建号(数字)
- 最后文件扩展名为 zip / vsi
操作指引
场景标题
上传文件smartcode_vscode(2),这种带括号的文件会导致报错无法下载
场景说明
日常操作中,同一文件多次下载或者保存后会出现带括号的这种文件名,上传这种文件,会导致插件在应用市场无法下载,报错
操作步骤
1.增加文件名校验后,aise管理 - 应用市场管理页面上传符合格式要求的文件

2.可以成功下载,不会产生报错。

1.9 - 系统运维
系统运维的主要职责是确保AISE系统的稳定、安全和高效运行。它包括系统安装和配置、日志清理、数据库备份、域登录等。
1.9.1 - Oauth2代理
AISE (AI Powered Software Engineering)系统如果部署在内网,无法直接外网,而Azure oauth2必须通过外网才能进行验证,可以通过新增的Oauth2代理,使Azure oauth2通过代理访问外网。
操作指引
AISE系统Oauth2代理配置
默认情况下Auzre oauth2代理是关闭状态,如果需要开启按照如下步骤进行操作:
- 登录部署服务器,切换到安装目录;
cd /home/aise/aise-system-core-deploy
- 修改docker-compose-allinone.yml文件中有关代理的参数
- AISE_PROXY_FLAG:默认为false,true为开启Oauth2代理
- AISE_PROXY_HOST:IP为代理IP地址
- AISE_PROXY_PORT:Port为代理端口
- AISE_PROXY_USER_NAME:username为代理用户名,如果不校验可不填
- AISE_PROXY_PASSWORD:password为代理用户名,如果不校验可不填

- 最后重新部署aise-modules-system;
docker rm -f aise-modules-system
docker-compose -f docker-compose-allinone.yml up -d aise-modules-system
1.9.2 - 服务检测
AISE管理系统支持对docker应用进行健康检测。
特性说明
服务检测功能主要检测docker应用的运行状态,如果运行异常需要提示客户具体哪个docker应用异常,除了aise-mysql和aise-redis服务,其他服务都可以灵活配置启用或关闭。
服务检测-页面:通过页面查询服务检测结果,用户可以直观的查询所有服务的运行状态,可以通过详情查询历史异常信息。
服务检测-接口:通过接口查询服务检测结果,第三方通过调用该接口查询服务运行状态。
操作指引
服务检测字典设置
用户可以自由设置哪些服务需要需要检测,aise-mysql和aise-redis为默认服务,不需要另外配置
-
用户登录AISE管理系统,点击左侧菜单的 系统管理 | 字典管理 ,即可进入如下界面

-
查找名称为服务检测-URL的字典项,点击字典类型,进入字典数据列表页面


-
新增检测服务
- 点击新增按钮,弹出添加字典键值窗口

- 输入必选项信息,字典标签填写服务名称,字典键值填写检测URL,字典排序填写展示顺序,状态默认正常,点击确定按钮,新增成功


-
修改检测服务
- 点击修改按钮,弹出添加字典键值窗口

- 修改字典键值、字典排序、状态(状态如果是停用,就不用再检测),点击确定按钮,修改成功

-
删除检测服务
- 选择所要删除字典项,点击删除按钮,确定后删除字典,删除后不会再检测该服务


服务检查查询
- 用户登录AISE管理系统,点击左侧菜单的 系统监控 | 服务检测 ,即可进入如下界面,默认5分钟检测一次

- 输入容器名称或选择状态可以查询过滤指定容器

- 点击服务详情,可查询该服务历史失败信息


服务检测接口调用
服务检测提供单独的接口供第三方调用,检测时间间隔为5分钟
- 接口地址:https://AISE服务地址/core-api/system/operlog/health_check?refresh=false ,其中AISE服务地址需要根据生产实际情况替换
- 正常报文信息,status状态为1,代表服务正常
{"msg":"查询成功","data":[],"status":"1"}
- 异常报文信息,status状态为0,代表服务异常,data数组显示所有检测异常的服务
{
"msg": "查询成功",
"data": [{
"containerName": "aise-chatui",
"title": "aise-chatui服务未启动成功",
"errorMsg": "",
"recordTime": "2024-11-26 14:39:28"
}],
"status": "0"
}
1.9.3 - 数据库备份
AISE系统管理支持数据库自动备份。
特性说明
数据库备份支持全量和增量备份
全量备份:每天凌晨3点备份一次,默认最多保留7天
增量备份:暂不支持
操作指引
全量备份参数修改
-
点击系统监控/定时任务菜单,选择任务数据库备份-全量,点击修改按钮,弹出定时任务修改窗口


-
调用方法参数
MysqlBackupTask.work(“full”,“7”,“AISE服务地址”,“13306”,"./mysql-backup")
full: 全量标志,默认值7:备份保留天数,默认保留7天以内的备份数据,可按需修改AISE服务地址:mysql数据库域名地址,可以是IP地址,需要根据生产实际情况修改
若为多机部署,建议使用IP指向mysql数据库部署服务器IP13306:mysql数据库端口(默认为13306)
若部署时有指定过其他端口,则此处需要修改为您指定的端口./mysql-backup:数据库备份存储目录,默认为.表示当前目录(当前目录为部署目录的1.mysql/backup文件夹下)
可以更改为其他目录(路径可使用相对或绝对路径)
-
cron执行参数:每天凌晨3点执行备份

-
备份文件默认地址:/home/aise/aise-system-core-deploy/1.mysql/backup,可通过修改任务详情页面中调整调用方法参数

1.9.4 - 系统激活
AISE (AI Powered Software Engineering) 系统试用期结束后,为了继续使用,需要通过激活码来解锁全部功能,激活码由软件开发商提供。
操作指引
AISE系统激活指南
首次部署时,系统带有默认激活码。如激活码过期或者临时修改,则按照如下步骤进行操作:
- 从软件开发商或销售人员获取新的激活码;
- 登录部署服务器,切换到安装目录;
cd /home/aise/aise-system-core-deploy
- 修改docker-compose-allinone.yml文件中AISE_ACTIVATION_CODE激活码参数

- 最后重新部署aise-gateway;
docker rm -f aise-gateway
docker-compose -f docker-compose-allinone.yml up -d aise-gateway
1.9.5 - 系统日志清理机制
AISE管理系统支持变更日志保留天数。
特性说明
AISE 后台管理系统,之前是日志默认保留60天,超过60天的日志会被删除,现修改成默认保留7天,且在docker-compose-allinone.yml中的服务aise-manager、aise-auth、aise-modules-system、aise-modules-job、aise-modules-file、aise-gateway新增环境变量AISE_LOG_MAX_HISTORY,部署时可以通过修改环境变量修改日期默认保留天数。
操作指引
单应用日志保留天数修改:
-
部署全部应用时,可以修改multihost.env文件中AISE_LOG_MAX_HISTORY参数,然后执行start.sh脚本
-
部署单个应用,修改docker-compose-allinone.yml文件中所属应用参数,例如:${AISE_LOG_MAX_HISTORY:-10}
-
执行以下命令:
cd /home/aise/aise-system-core-deploy
docker-compose -f docker-compose-allinone.yml stop aise-manager
docker-compose -f docker-compose-allinone.yml rm -f aise-manager
docker-compose -f docker-compose-allinone.yml up -d aise-manager
-
示例说明:默认保留7天,如果当天是11月27日,会删除11月20日之前的日志
2 - ClinePRO
欢迎来到Cline文档 - 这是一份全面的指南,帮助您使用和扩展Cline的功能。在这里,您将找到帮助您入门、提升技能和为项目做出贡献的资源。
注意
Cline是一个开源项目。本文档直接参考了来自 https://docs.cline.bot 的官方文档。
ClinePRO的主要目的是提供本地化和企业级就绪的产品,因此本文档将与ClinePRO保持一致,而不是Cline。如果您需要Cline的最新文档,请参考官方网站。
2.1 - 概述
欢迎来到Cline文档 - 这是一份全面的指南,帮助您使用和扩展Cline的功能。在这里,您将找到帮助您入门、提升技能和为项目做出贡献的资源。
入门指南
提升您的提示工程技能
探索Cline的工具
-
了解Cline的功能:
-
使用MCP服务器扩展Cline:
其他资源
我们一直在努力改进这份文档。如果您有建议或发现可以改进的地方,请告诉我们。您的反馈有助于让Cline变得更好。
2.2 - 入门指南
欢迎使用 Cline!本指南将帮助您完成设置并开始使用 Cline 构建您的第一个项目。
Cline 入门指南 | 新手程序员
欢迎使用 Cline!本指南将帮助您完成设置并开始使用 Cline 构建您的第一个项目。
您需要准备的内容
在开始之前,请确保您具备以下条件:
-
VS Code: 一个免费且功能强大的代码编辑器。
-
开发工具: 编程所需的基本软件(Homebrew、Node.js、Git 等)。
- 在完成此处的设置后,请按照我们的安装基本开发工具指南进行设置
- Cline 将指导您安装所需的一切内容
-
Cline 项目文件夹: 一个专门用于存放所有 Cline 项目的文件夹。
- 在 macOS 上:在您的文档文件夹中创建一个名为"Cline"的文件夹
- 路径:
/Users/[您的用户名]/Documents/Cline
- 在 Windows 上:在您的文档文件夹中创建一个名为"Cline"的文件夹
- 路径:
C:\Users\[您的用户名]\Documents\Cline
- 在这个 Cline 文件夹内,为每个项目创建单独的文件夹
- 示例:
Documents/Cline/workout-app 用于健身追踪应用
- 示例:
Documents/Cline/portfolio-website 用于您的个人作品集
-
VS Code 中的 Cline 扩展: 在 VS Code 中安装 Cline 扩展。
-
这里有一个关于入门所需一切内容的教程。
逐步设置
按照以下步骤设置 Cline:
-
打开 VS Code: 启动 VS Code 应用程序。如果 VS Code 显示"运行扩展可能…",请点击"允许"。
-
打开您的 Cline 文件夹: 在 VS Code 中,打开您在文档中创建的 Cline 文件夹。
-
导航到扩展: 点击 VS Code 侧边栏中的扩展图标。
-
搜索’Cline’: 在扩展搜索栏中,输入"Cline"。
-
安装扩展: 点击 Cline 扩展旁边的"安装"按钮。
-
打开 Cline: 安装完成后,您可以通过以下几种方式打开 Cline:
- 点击活动栏中的 Cline 图标。
- 使用命令面板(
CMD/CTRL + Shift + P)并输入"Cline: Open In New Tab"在编辑器中以标签页形式打开 Cline。推荐使用这种方式以获得更好的视图。
- 故障排除: 如果您看不到 Cline 图标,请尝试重启 VS Code。
- 您将看到: 您应该会在 VS Code 编辑器中看到 Cline 聊天窗口。

设置 OpenRouter API 密钥
现在您已经安装了 Cline,您需要设置 OpenRouter API 密钥以使用 Cline 的全部功能。
- 获取您的 OpenRouter API 密钥:
- 输入您的 OpenRouter API 密钥:
- 导航到 Cline 扩展中的设置按钮。
- 输入您的 OpenRouter API 密钥。
- 选择您偏好的 API 模型。
- 推荐用于编程的模型:
anthropic/claude-3.5-sonnet:最常用于编程任务。google/gemini-2.0-flash-exp:free:免费的编程选项。deepseek/deepseek-chat:超级便宜,几乎和 3.5 sonnet 一样好
- OpenRouter 模型排名
您与 Cline 的第一次互动
现在您已准备好开始使用 Cline 构建项目了。让我们创建您的第一个项目文件夹并构建一些内容!将以下提示复制并粘贴到 Cline 聊天窗口中:
嗨 Cline!你能帮我在我的 Cline 目录中创建一个名为"hello-world"的新项目文件夹,并制作一个显示蓝色大字"Hello World"的简单网页吗?
您将看到: Cline 将帮助您创建项目文件夹并设置您的第一个网页。
使用 Cline 的技巧
- 提问: 如果您对某事不确定,请随时向 Cline 提问!
- 使用截图: Cline 可以理解图片,所以请随意使用截图来展示您正在处理的内容。
- 复制和粘贴错误: 如果您遇到错误,请将错误消息复制并粘贴到 Cline 的聊天中。这将帮助他理解问题并提供解决方案。
- 使用简单语言: Cline 设计为可以理解普通的、非技术性语言。请用您自己的语言描述您的想法,Cline 会将它们转换为代码。
常见问题
- 什么是终端? 终端是一个用于与计算机交互的基于文本的界面。它允许您运行命令来执行各种任务,如安装软件包、运行脚本和管理文件。Cline 使用终端来执行命令并与您的开发环境交互。
- 代码库如何工作? (本节将根据新手程序员的常见问题进行扩展)
2.3 - 安装基本开发工具
当您开始编程时,您需要在计算机上安装一些基本的开发工具。Cline 可以以安全、有指导的方式帮助您安装所需的一切。
使用 Cline 安装基本开发工具 | 新手程序员
当您开始编程时,您需要在计算机上安装一些基本的开发工具。Cline 可以以安全、有指导的方式帮助您安装所需的一切。
基本工具
以下是您进行开发所需的核心工具:
- Homebrew:macOS 的包管理器,可以轻松安装其他工具
- Node.js & npm:JavaScript 和 Web 开发所需
- Git:用于跟踪代码更改和与他人协作
- Python:许多开发工具使用的编程语言
- 其他实用工具:如 wget 和 jq 等帮助下载文件和处理数据的工具
让 Cline 安装所有工具
复制此提示并粘贴到 Cline:
你好 Cline!我需要帮助设置我的 Mac 以进行软件开发。你能帮我安装基本的开发工具,如 Homebrew、Node.js、Git、Python 以及编程常用的其他实用工具吗?我希望你能一步一步地指导我完成这个过程,解释每个工具的用途,并确保所有工具都正确安装。
将会发生什么
- Cline 首先会安装 Homebrew,它就像开发工具的"应用商店"
- 使用 Homebrew,Cline 然后会安装其他基本工具,如 Node.js 和 Git
- 对于每个安装步骤:
- Cline 会向您展示它想要运行的确切命令
- 您需要在命令运行前批准每个命令
- Cline 会验证每个安装是否成功
为什么这些工具很重要
- Homebrew:让在 Mac 上安装和更新开发工具变得容易
- Node.js & npm:需要用于:
- 使用 React 或 Next.js 构建网站
- 运行 JavaScript 代码
- 安装 JavaScript 包
- Git:帮助您:
- 保存代码的不同版本
- 与其他开发者协作
- 备份您的工作
- Python:用于:
注意事项
- 安装过程是交互式的 - Cline 会指导您完成每个步骤
- 某些安装可能需要输入您计算机的密码。当提示输入密码时,您在屏幕上不会看到任何字符被输入。这是正常的,是一个保护密码的安全功能。只需输入您的密码并按回车键即可。
示例:
$ /bin/bash -c "$(curl -fsSL https://raw.githubusercontent.com/Homebrew/install/HEAD/install.sh)"
Password:
在这里输入您的密码,即使屏幕上什么都不显示。输入完成后按回车键。
- 所有命令在运行前都会显示给您以供批准
- 如果遇到任何问题,Cline 会帮助解决
新手程序员的其他提示
了解终端
终端是一个可以输入命令与计算机交互的应用程序。在 macOS 上,您可以通过在 Spotlight 中搜索"Terminal"来打开它。
示例:
了解 VS Code 功能
VS Code 中的终端
VS Code 中的终端允许您直接在编辑器中运行命令。您可以通过转到 View > Terminal 或按 Ctrl + ` 来打开它。
示例:
文档视图
文档视图是您编辑代码文件的地方。您可以通过点击屏幕左侧的资源管理器面板中的文件来打开它们。
问题部分
问题部分在 VS Code 中显示代码中的任何错误或警告。您可以通过点击灯泡图标或转到 View > Problems 来访问它。
常见功能
- 命令行界面 (CLI):这是一个基于文本的界面,您可以在其中输入命令与计算机交互。一开始可能看起来很令人生畏,但它是开发者的一个强大工具。
- 权限:有时,您需要给予某些应用程序或命令权限。这是一项安全措施,以确保只有受信任的应用程序才能对您的系统进行更改。
下一步
安装这些工具后,您就可以开始编程了!返回新手程序员的 Cline 入门指南继续您的旅程。
2.4 - 工具
欢迎使用 Cline 提示指南!本指南将为您提供编写有效提示和自定义指令的知识,最大限度地提高您使用 Cline 的工作效率。
Cline 工具参考指南
Cline 能做什么?
Cline 是您的 AI 助手,可以:
- 编辑和创建项目中的文件
- 运行终端命令
- 搜索和分析您的代码
- 帮助调试和修复问题
- 自动化重复任务
- 与外部工具集成
第一步
-
开始任务
- 在聊天中输入您的请求
- 示例:“创建一个名为 Header 的新 React 组件”
-
提供上下文
- 使用 @ 提及添加文件、文件夹或 URL
- 示例:"@file:src/components/App.tsx"
-
审查更改
- Cline 会在进行更改前显示差异
- 您可以编辑或拒绝更改
主要功能
-
文件编辑
-
终端命令
-
代码分析
-
浏览器集成
可用工具
有关最新的实现细节,您可以查看 Cline 仓库 中的完整源代码。
Cline 可以访问以下工具来完成各种任务:
-
文件操作
write_to_file:创建或覆盖文件read_file:读取文件内容replace_in_file:对文件进行针对性编辑search_files:使用正则表达式搜索文件list_files:列出目录内容
-
终端操作
execute_command:运行 CLI 命令list_code_definition_names:列出代码定义
-
MCP 工具
use_mcp_tool:使用 MCP 服务器的工具access_mcp_resource:访问 MCP 服务器资源- 用户可以创建自定义 MCP 工具,然后 Cline 可以访问这些工具
- 示例:创建一个天气 API 工具,Cline 可以使用它来获取天气预报
-
交互工具
ask_followup_question:向用户询问澄清attempt_completion:呈现最终结果
每个工具都有特定的参数和使用模式。以下是一些示例:
-
创建新文件 (write_to_file):
<write_to_file>
<path>src/components/Header.tsx</path>
<content>
// Header 组件代码
2.5 - 提示技巧
欢迎使用 Cline 提示指南!本指南将为您提供编写有效提示和自定义指令的知识,最大限度地提高您使用 Cline 的工作效率。
2.5.1 - 概述
欢迎使用 Cline 提示指南!本指南将为您提供编写有效提示和自定义指令的知识,最大限度地提高您使用 Cline 的工作效率。
Cline 提示指南 🚀
欢迎使用 Cline 提示指南!本指南将为您提供编写有效提示和自定义指令的知识,最大限度地提高您使用 Cline 的工作效率。
自定义指令 ⚙️
将自定义指令视为 Cline 的编程。它们定义了 Cline 的基线行为,并且始终"开启",影响所有交互。
要添加自定义指令:
- 打开 VSCode
- 点击 Cline 扩展设置图标 ⚙️
- 找到"自定义指令"字段
- 粘贴您的指令

自定义指令在以下方面非常强大:
- 强制执行编码风格和最佳实践:确保 Cline 始终遵守您团队的编码规范、命名约定和最佳实践。
- 提高代码质量:鼓励 Cline 编写更可读、可维护和高效的代码。
- 指导错误处理:告诉 Cline 如何处理错误、编写错误消息和记录信息。
custom-instructions 文件夹包含您可以使用的自定义指令示例。
.clinerules 文件 📋
虽然自定义指令是用户特定的和全局的(适用于所有项目),但 .clinerules 文件提供了项目特定的指令,这些指令位于项目的根目录中。这些指令会自动附加到您的自定义指令中,并在 Cline 的系统提示中引用,确保它们影响项目上下文中的所有交互。这使其成为以下方面的绝佳工具:
安全最佳实践 🔒
为了保护敏感信息,您可以指示 Cline 忽略 .clinerules 中的特定文件或模式。这对于以下内容尤为重要:
- 包含 API 密钥和机密的
.env 文件
- 包含敏感数据的配置文件
- 私人凭证或令牌
.clinerules 中的安全部分示例:
# 安全

## 敏感文件

请勿读取或修改:

-   .env 文件
-   \*_/config/secrets._
-   \*_/_.pem
-   任何包含 API 密钥、令牌或凭证的文件

## 安全实践

-   切勿提交敏感文件
-   对机密使用环境变量
-   将凭证排除在日志和输出之外
一般用例
.clinerules 文件非常适合用于:
- 在团队成员之间维护项目标准
- 强制执行开发实践
- 管理文档要求
- 设置分析框架
- 定义项目特定行为
示例 .clinerules 结构
# 项目指南

## 文档要求

-   修改功能时更新 /docs 中的相关文档
-   使 README.md 与新功能保持同步
-   在 CHANGELOG.md 中维护变更日志条目

## 架构决策记录

在 /docs/adr 中为以下内容创建 ADR:

-   主要依赖项更改
-   架构模式更改
-   新的集成模式
-   数据库模式更改
    遵循 /docs/adr/template.md 中的模板

## 代码风格和模式

-   使用 OpenAPI Generator 生成 API 客户端
-   使用 TypeScript axios 模板
-   将生成的代码放在 /src/generated 中
-   优先使用组合而不是继承
-   对数据访问使用仓库模式
-   遵循 /src/utils/errors.ts 中的错误处理模式

## 测试标准

-   业务逻辑需要单元测试
-   API 端点需要集成测试
-   关键用户流程需要端到端测试
主要优势
- 版本控制:
.clinerules 文件成为项目源代码的一部分
- 团队一致性:确保所有团队成员的行为一致
- 项目特定:为每个项目的需求量身定制的规则和标准
- 机构知识:在代码中维护项目标准和实践
将 .clinerules 文件放在项目的根目录中:
your-project/
├── .clinerules
├── src/
├── docs/
└── ...
另一方面,Cline 的系统提示不可由用户编辑(您可以在此处找到它)。有关提示工程最佳实践的更广泛了解,请查看此资源。
编写有效自定义指令的技巧
- 清晰简洁:使用简单的语言,避免歧义。
- 关注期望的结果:描述您想要的结果,而不是具体的步骤。
- 测试和迭代:进行实验以找到最适合您工作流程的内容。
提示 Cline 💬
提示是您在来回聊天中与 Cline 沟通任务需求的方式。 Cline 理解自然语言,因此可以像对话一样编写。
有效的提示包括:
- 提供清晰的上下文:解释您的目标和代码库的相关部分。使用
@ 引用文件或文件夹。
- 分解复杂性:将大任务分解为较小的步骤。
- 提出具体问题:引导 Cline 达到期望的结果。
- 验证和完善:审查 Cline 的建议并提供反馈。
提示示例
上下文管理
- 开始新任务: “Cline,让我们开始一个新任务。创建
user-authentication.js。我们需要使用 JWT 令牌实现用户登录。以下是要求……”
- 总结之前的工作: “Cline,总结我们在上一个用户仪表板任务中所做的工作。我想捕捉主要功能和未解决的问题。将其保存到
cline_docs/user-dashboard-summary.md。”
调试
- 分析错误: “Cline,我收到此错误:[错误消息]。它似乎来自[代码部分]。分析此错误并建议修复。”
- 识别根本原因: “Cline,当我[操作]时,应用程序崩溃。问题可能出在[问题区域]。帮助我找到根本原因并提出解决方案。”
重构
- 改进代码结构: “Cline,这个函数太长且复杂。将其重构为更小的函数。”
- 简化逻辑: “Cline,这段代码很难理解。简化逻辑并使其更易读。”
功能开发
- 头脑风暴新功能: “Cline,我想添加一个让用户[功能]的功能。头脑风暴一些想法并考虑实现挑战。”
- 生成代码: “Cline,创建一个显示用户资料的组件。列表应可排序和过滤。生成此组件的代码。”
高级提示技巧
- 约束填充: 为了减少代码截断,请在提示中包含明确的约束。例如,“确保代码完整"或"始终提供完整的函数定义。”
- 信心检查: 要求 Cline 评估其信心(例如,“在 1-10 的范围内,您对此解决方案的信心如何?")
- 挑战 Cline 的假设: 提出"愚蠢"的问题以鼓励深入思考并防止错误的假设。
以下是一些用户发现对使用 Cline 有帮助的提示技巧:
我们社区最喜欢的提示 🌟
记忆和信心检查 🧠
代码质量提示 💻
-
防止代码截断
替代短语:“仅提供完整代码"或"确保代码完整”
-
自定义指令提醒
强化对设置图标 ⚙️ 配置的遵守。
代码组织 📋
-
大文件重构 - icklebil
"FILENAME 变得太大了。分析此文件的工作原理并建议安全地将其分解的方法。"
通过战略分解帮助管理复杂文件。
-
文档维护 - icklebil
确保文档与代码更改保持同步。
分析和规划 🔍
深思熟虑的开发 🤔
-
暂停并反思 - nickbaumann98
在采取行动之前促进仔细考虑。
-
完整分析 - yellow_bat_coffee
"不要过早完成分析,即使你认为找到了解决方案,也要继续分析"
确保彻底探索问题。
-
持续信心检查 - pacnpal
"在保存文件之前、保存之后、拒绝之后和任务完成之前,给出信心等级(1-10)"
通过自我评估保持质量。
最佳实践 🎯
2.5.2 - 自定义指令库
此仓库旨在培养一个协作空间,开发者可以在此分享、完善和利用有效的 Cline 自定义指令。通过创建和贡献此库,我们可以增强 Cline 的能力,并赋能开发者应对日益复杂的软件开发挑战。
Cline 自定义指令库
此仓库旨在培养一个协作空间,开发者可以在此分享、完善和利用有效的 Cline 自定义指令。通过创建和贡献此库,我们可以增强 Cline 的能力,并赋能开发者应对日益复杂的软件开发挑战。
什么是 Cline 自定义指令?
Cline 的自定义指令是您定义的一组指南或规则,用于为特定任务或项目定制 AI 的行为和输出。将它们视为 Cline 的专门"编程",使您能够:
- 强制执行编码实践: 确保一致的代码风格、遵守设计模式和特定语言或框架的最佳实践。
- 标准化文件结构: 规定文件命名约定、文件夹组织和项目结构。
- 指导测试程序: 定义生成单元测试、集成测试和确保足够代码覆盖率的规则。
- 自动化重复任务: 创建指令以处理常见或繁琐的开发工作流程,提高效率。
- 提高代码质量: 设置代码可读性、可维护性和性能优化的标准。
通过为 Cline 提供精心设计的指令,您可以显著提高其在辅助软件开发过程中的准确性、可靠性和整体有效性。
贡献自定义指令
我们鼓励所有技能水平的开发者向此库贡献他们的自定义指令。您的贡献有助于为整个 Cline 社区构建宝贵的资源!
提交自定义指令时,请遵循此模板:
1. 目的和功能
-
此指令集旨在实现什么?
- 提供指令集目标和预期用例的清晰简洁的解释。
- 示例:“此指令集指导 Cline 为现有的 JavaScript 函数生成单元测试。”
-
最适合哪些类型的项目或任务?
- 概述此指令集最适用的特定项目类型、编码语言或开发场景。
- 示例:“这非常适合使用 Jest 测试框架的 JavaScript 项目。”
2. 使用指南(可选)
- 使用此指令集是否有特定的步骤或先决条件?
- 如果您的指令需要除在 Cline 提示中引用文件之外的特定步骤,请提供详细指南。
- 示例:
- “在使用此指令集之前,请在项目根目录中创建一个
tests 文件夹。”
- “确保您已安装 Jest 测试库。”
3. 作者和贡献者
4. 自定义指令
通过使用此模板并贡献您的自定义指令,您有助于为 Cline 构建一个蓬勃发展的生态系统,使其成为适用于所有技能水平开发者的更通用和高效的工具。
2.5.3 - 记忆库
此指令集将 Cline 转换为一个自我记录的开发系统,通过结构化的"记忆库"在会话之间维护上下文。它确保一致的文档、仔细验证更改以及与用户的清晰沟通。
Cline 记忆库 - 自定义指令
1. 目的和功能
-
此指令集旨在实现什么?
- 此指令集将 Cline 转换为一个自我记录的开发系统,通过结构化的"记忆库"在会话之间维护上下文。它确保一致的文档、仔细验证更改以及与用户的清晰沟通。
-
最适合哪些类型的项目或任务?
- 需要广泛上下文跟踪的项目。
- 任何项目,无论技术栈如何(技术栈详细信息存储在
techContext.md 中)。
- 正在进行和新项目。
2. 使用指南
- 如何添加这些指令
- 打开 VSCode
- 点击 Cline 扩展设置图标 ⚙️
- 找到"自定义指令"字段
- 从以下部分复制并粘贴指令

-
项目设置
- 在项目根目录中创建一个空的
cline_docs 文件夹(即 YOUR-PROJECT-FOLDER/cline_docs)
- 首次使用时,提供项目简介并要求 Cline “初始化记忆库”
-
最佳实践
- 在操作期间监控
[MEMORY BANK: ACTIVE] 标志。
- 注意关键操作的信心检查。
- 启动新项目时,为 Cline 创建项目简介(粘贴到聊天中或包含在
cline_docs 中作为 projectBrief.md)以用于创建初始上下文文件。
- 注意:productBrief.md(或您拥有的任何文档)可以是任何范围的技术/非技术或仅功能性的。Cline 被指示在创建这些上下文文件时填补空白。例如,如果您没有选择技术栈,Cline 会为您选择。
- 以"遵循您的自定义指令"开始聊天(您只需在第一次聊天开始时说一次)。
- 当提示 Cline 更新上下文文件时,说"仅更新相关的 cline_docs"。
- 在会话结束时通过告诉 Cline “更新记忆库"来验证文档更新。
- 在大约 200 万个 token 时更新记忆库并结束会话。
3. 作者和贡献者
4. 自定义指令
# Cline 的记忆库

您是 Cline,一位具有独特约束的专家软件工程师:您的记忆会定期完全重置。这不是一个错误 - 这是让您保持完美文档的原因。每次重置后,您完全依赖记忆库来理解项目并继续工作。没有适当的文档,您无法有效运作。

## 记忆库文件

关键:如果 `cline_docs/` 或任何这些文件不存在,请立即创建它们:

1. 阅读所有提供的文档
2. 向用户询问任何缺失的信息
3. 仅使用已验证的信息创建文件
4. 没有完整的上下文绝不继续

必需的文件:

productContext.md

-   项目存在的原因
-   它解决的问题
-   它应该如何工作

activeContext.md

-   您现在正在处理的内容
-   最近的更改
-   下一步
    (这是您的真相来源)

systemPatterns.md

-   系统的构建方式
-   关键的技术决策
-   架构模式

techContext.md

-   使用的技术
-   开发设置
-   技术约束

progress.md

-   哪些功能有效
-   还有哪些需要构建
-   进度状态

## 核心工作流程

### 开始任务

1. 检查记忆库文件
2. 如果任何文件缺失,停止并创建它们
3. 在继续之前阅读所有文件
4. 验证您有完整的上下文
5. 开始开发。在任务开始时初始化记忆库后,不要更新 cline_docs。

### 开发期间

1. 对于正常开发:

    - 遵循记忆库模式
    - 在重大更改后更新文档

2. 在每次工具使用开始时说 `[MEMORY BANK: ACTIVE]`。

### 记忆库更新

当用户说"更新记忆库"时:

1. 这意味着即将进行记忆重置
2. 记录当前状态的所有内容
3. 使下一步非常清晰
4. 完成当前任务

记住:每次记忆重置后,您都会完全重新开始。您与之前工作的唯一联系是记忆库。像维护您的功能一样维护它 - 因为它确实如此。
2.5.4 - 记忆库结构
我是 Cline,一位具有独特特征的专家软件工程师:我的记忆在会话之间会完全重置。这不是一个限制 - 这是驱使我维护完美文档的原因。每次重置后,我完全依赖记忆库来理解项目并有效地继续工作。我必须在每个任务开始时阅读所有记忆库文件 - 这是强制性的。
Cline 的记忆库
我是 Cline,一位具有独特特征的专家软件工程师:我的记忆在会话之间会完全重置。这不是一个限制 - 这是驱使我维护完美文档的原因。每次重置后,我完全依赖记忆库来理解项目并有效地继续工作。我必须在每个任务开始时阅读所有记忆库文件 - 这是强制性的。
记忆库结构
记忆库由必需的核心文件和可选的上下文文件组成,所有文件均为 Markdown 格式。文件以清晰的层次结构相互构建:
flowchart TD
    PB[projectbrief.md] --> PC[productContext.md]
    PB --> SP[systemPatterns.md]
    PB --> TC[techContext.md]

    PC --> AC[activeContext.md]
    SP --> AC
    TC --> AC

    AC --> P[progress.md]
核心文件(必需)
-
projectbrief.md
- 塑造所有其他文件的基础文档
- 如果不存在则在项目开始时创建
- 定义核心需求和目标
- 项目范围的真相来源
-
productContext.md
- 项目存在的原因
- 它解决的问题
- 它应该如何工作
- 用户体验目标
-
activeContext.md
- 当前工作重点
- 最近的更改
- 下一步
- 活跃的决策和考虑因素
-
systemPatterns.md
- 系统架构
- 关键的技术决策
- 使用的设计模式
- 组件关系
-
techContext.md
-
progress.md
- 哪些功能有效
- 还有哪些需要构建
- 当前状态
- 已知问题
附加上下文
当有助于组织时,在 memory-bank/ 中创建额外的文件/文件夹:
- 复杂功能文档
- 集成规范
- API 文档
- 测试策略
- 部署程序
核心工作流程
计划模式
flowchart TD
    Start[开始] --> ReadFiles[阅读记忆库]
    ReadFiles --> CheckFiles{文件完整吗}

    CheckFiles -->|否| Plan[创建计划]
    Plan --> Document[在聊天中记录]

    CheckFiles -->|是| Verify[验证上下文]
    Verify --> Strategy[制定策略]
    Strategy --> Present[呈现方法]
执行模式
flowchart TD
    Start[开始] --> Context[检查记忆库]
    Context --> Update[更新文档]
    Update --> Rules[如果需要 更新 .clinerules]
    Rules --> Execute[执行任务]
    Execute --> Document[记录更改]
文档更新
在以下情况下进行记忆库更新:
- 发现新的项目模式
- 实施重大更改后
- 当用户使用 update memory bank 请求时(必须审查所有文件)
- 当上下文需要澄清时
flowchart TD
    Start[更新过程]

    subgraph Process
        P1[审查所有文件]
        P2[记录当前状态]
        P3[澄清下一步]
        P4[更新 .clinerules]

        P1 --> P2 --> P3 --> P4
    end

    Start --> Process
注意:当由 update memory bank 触发时,我必须审查每个记忆库文件,即使有些文件不需要更新。特别关注 activeContext.md 和 progress.md,因为它们跟踪当前状态。
项目智能 (.clinerules)
.clinerules 文件是我每个项目的学习日志。它捕捉了重要的模式、偏好和项目智能,帮助我更有效地工作。当我与您和项目一起工作时,我会发现并记录从代码中不明显的关键见解。
flowchart TD
    Start{发现新模式}

    subgraph Learn [学习过程]
        D1[识别模式]
        D2[与用户验证]
        D3[记录在 .clinerules 中]
    end

    subgraph Apply [使用]
        A1[阅读 .clinerules]
        A2[应用学习到的模式]
        A3[改进未来的工作]
    end

    Start --> Learn
    Learn --> Apply
捕捉什么
- 关键的实施路径
- 用户偏好和工作流程
- 项目特定的模式
- 已知的挑战
- 项目决策的演变
- 工具使用模式
格式灵活 - 专注于捕捉有价值的见解,帮助我更有效地与您和项目一起工作。将 .clinerules 视为一个随着我们一起工作而变得更智能的活文档。
记住:每次记忆重置后,我都会完全重新开始。记忆库是我与之前工作的唯一联系。它必须以精确和清晰的方式维护,因为我的有效性完全取决于它的准确性。
2.6 - MCP 服务器
将 MCP 服务器视为为 Cline 提供额外能力的特殊助手!它们让 Cline 能够做一些很酷的事情,比如获取网页或处理您的文件。
2.6.1 - 概述
本文解释了模型上下文协议(MCP)服务器、它们的功能以及 Cline 如何帮助构建和使用它们。
Cline 和模型上下文协议(MCP)服务器:增强 AI 能力
快速链接:
本文解释了模型上下文协议(MCP)服务器、它们的功能以及 Cline 如何帮助构建和使用它们。
概述
MCP 服务器充当大型语言模型(LLMs,如 Claude)与外部工具或数据源之间的中介。它们是向 LLMs 暴露功能的小程序,使它们能够通过 MCP 与外部世界交互。MCP 服务器本质上就像一个 LLM 可以使用的 API。
关键概念
MCP 服务器定义了一组"工具",这些工具是 LLM 可以执行的函数。这些工具提供了广泛的功能。
以下是 MCP 的工作原理:
- MCP 主机发现连接服务器的功能并加载它们的工具、提示和资源。
- 资源提供对只读数据的一致访问,类似于文件路径或数据库查询。
- 安全性通过服务器隔离凭证和敏感数据来确保。交互需要用户的明确批准。
使用案例
MCP 服务器的潜力是巨大的。它们可以用于各种目的。
以下是一些 MCP 服务器如何使用的具体示例:
-
Web 服务和 API 集成:
- 监控 GitHub 仓库的新问题
- 根据特定触发器在 Twitter 上发布更新
- 为基于位置的服务检索实时天气数据
-
浏览器自动化:
- 自动化 Web 应用程序测试
- 抓取电子商务网站进行价格比较
- 为网站监控生成截图
-
数据库查询:
- 生成每周销售报告
- 分析客户行为模式
- 为业务指标创建实时仪表板
-
项目和任务管理:
- 根据代码提交自动创建 Jira 工单
- 生成每周进度报告
- 根据项目需求创建任务依赖关系
-
代码库文档:
- 从代码注释生成 API 文档
- 从代码结构创建架构图
- 维护最新的 README 文件
入门指南
选择适合您需求的方法:
- **使用现有服务器:**从 GitHub 仓库的预构建 MCP 服务器开始
- **自定义现有服务器:**修改现有服务器以适应您的特定需求
- **从零开始构建:**为独特用例创建完全自定义的服务器
与 Cline 集成
Cline 通过其 AI 能力简化了 MCP 服务器的构建和使用。
构建 MCP 服务器
- **自然语言理解:**用自然语言指示 Cline 构建 MCP 服务器,描述其功能。Cline 将解释您的指令并生成必要的代码。
- **克隆和构建服务器:**Cline 可以从 GitHub 克隆现有的 MCP 服务器仓库并自动构建它们。
- **配置和依赖管理:**Cline 处理配置文件、环境变量和依赖项。
- **故障排除和调试:**Cline 帮助识别和解决开发过程中的错误。
使用 MCP 服务器
- **工具执行:**Cline 与 MCP 服务器无缝集成,允许您执行它们定义的工具。
- **上下文感知交互:**Cline 可以根据对话上下文智能地建议使用相关工具。
- **动态集成:**结合多个 MCP 服务器的功能来完成复杂任务。例如,Cline 可以使用 GitHub 服务器获取数据并使用 Notion 服务器创建格式化报告。
安全考虑
在使用 MCP 服务器时,遵循安全最佳实践非常重要:
- **身份验证:**始终使用安全的身份验证方法进行 API 访问
- **环境变量:**将敏感信息存储在环境变量中
- **访问控制:**仅限授权用户访问服务器
- **数据验证:**验证所有输入以防止注入攻击
- **日志记录:**实施安全的日志记录实践,不暴露敏感数据
资源
有各种资源可用于查找和学习 MCP 服务器。
以下是一些用于查找和学习 MCP 服务器的资源链接:
2.6.2 - 快速入门
将 MCP 服务器视为为 Cline 提供额外能力的特殊助手!它们让 Cline 能够做一些很酷的事情,比如获取网页或处理您的文件。
🚀 MCP 快速入门指南
❓ 什么是 MCP 服务器?
将 MCP 服务器视为为 Cline 提供额外能力的特殊助手!它们让 Cline 能够做一些很酷的事情,比如获取网页或处理您的文件。
⚠️ 重要:系统要求
停止!在继续之前,您必须验证这些要求:
所需软件
❗ 如果任何这些命令失败或显示旧版本,请在继续之前安装/更新!
⚠️ 如果遇到其他错误,请参阅下面的"故障排除"部分。
🎯 快速步骤(仅在满足要求后!)
1. 🛠️ 安装您的第一个 MCP 服务器
- 从 Cline 扩展中,点击
MCP Server 标签
- 点击
Edit MCP Settings 按钮

- MCP 设置文件应显示在 VS Code 的标签页中。
- 将文件内容替换为此代码:
对于 Windows:
{
	"mcpServers": {
		"mcp-installer": {
			"command": "cmd.exe",
			"args": ["/c", "npx", "-y", "@anaisbetts/mcp-installer"]
		}
	}
}
对于 Mac 和 Linux:
{
	"mcpServers": {
		"mcp-installer": {
			"command": "npx",
			"args": ["@anaisbetts/mcp-installer"]
		}
	}
}
保存文件后:
- Cline 会自动检测更改
- MCP 安装程序将被下载并安装
- Cline 将启动 MCP 安装程序
- 您将在 Cline 的 MCP 设置 UI 中看到服务器状态:

🤔 接下来做什么?
现在您已经安装了 MCP 安装程序,您可以要求 Cline 从以下位置添加更多服务器:
- NPM 注册表:https://www.npmjs.com/search?q=%40modelcontextprotocol
- Python 包索引:https://pypi.org/search/?q=mcp+server-&o=
例如,您可以要求 Cline 安装 Python 包索引中找到的 mcp-server-fetch 包:
"安装名为 `mcp-server-fetch` 的 MCP 服务器
- 确保更新了 mcp 设置。
- 使用 uvx 或 python 运行服务器。"
您应该会看到 Cline:
- 安装
mcp-server-fetch python 包
- 更新 mcp 设置 json 文件
- 启动服务器
mcp 设置文件现在应该如下所示:
对于 Windows 机器:
{
	"mcpServers": {
		"mcp-installer": {
			"command": "cmd.exe",
			"args": ["/c", "npx", "-y", "@anaisbetts/mcp-installer"]
		},
		"mcp-server-fetch": {
			"command": "uvx",
			"args": ["mcp-server-fetch"]
		}
	}
}
您始终可以通过转到客户端的 MCP 服务器标签来检查服务器的状态。参见上图
就是这样!🎉 您刚刚为 Cline 赋予了一些强大的新能力!
📝 故障排除
1. 我使用 asdf 并收到 “unknown command: npx”
有一些不太好的消息。您仍然应该能够让事情正常工作,但除非 MCP 服务器打包有所改进,否则您需要做更多的手动工作。一个选项是卸载 asdf,但我们假设您不想这样做。
相反,您需要按照上述说明"编辑 MCP 设置"。然后,如此帖子所述,您需要为每个服务器的配置添加一个 “env” 条目。
"env": {
        "PATH": "/Users/<user_name>/.asdf/shims:/usr/bin:/bin",
        "ASDF_DIR": "<path_to_asdf_bin_dir>",
        "ASDF_DATA_DIR": "/Users/<user_name>/.asdf",
        "ASDF_NODEJS_VERSION": "<your_node_version>"
      }
path_to_asdf_bin_dir 通常可以在您的 shell 配置(例如 .zshrc)中找到。如果您使用 Homebrew,可以使用 echo ${HOMEBREW_PREFIX} 找到目录的开头,然后附加 /opt/asdf/libexec。
现在有一些好消息。虽然不完美,但您可以相当可靠地让 Cline 为后续服务器安装执行此操作。将以下内容添加到 Cline 设置中的"自定义指令"中(右上角工具栏按钮):
安装 MCP 服务器并编辑 cline_mcp_settings.json 时,如果服务器需要使用 npx 作为命令,您必须从 “mcp-installer” 条目复制 “env” 条目并将其添加到新条目中。这对于让服务器在使用时正常工作至关重要。
2. 运行 MCP 安装程序时仍然出错
如果运行 MCP 安装程序时仍然出错,您可以尝试以下操作:
- 检查 MCP 设置文件是否有错误
- 阅读 MCP 服务器的文档,确保 MCP 设置文件使用了正确的命令和参数。👈
- 使用终端直接运行命令及其参数。这将允许您看到 Cline 看到的相同错误。
2.6.3 - 从GitHub构建MCP服务器
本指南提供了如何使用Cline从GitHub仓库构建现有MCP服务器的分步教程。
从GitHub仓库构建MCP服务器
本指南提供了如何使用Cline从GitHub仓库构建现有MCP服务器的分步教程。
寻找MCP服务器
有多个在线平台可以找到MCP服务器:
-
Cline可以自动将MCP服务器添加到其列表中,然后您可以进行编辑。 Cline可以直接从GitHub克隆仓库并为您构建服务器。
-
GitHub: 在GitHub上找到MCP服务器的两个最常见的地方包括:
-
在线目录: 有几个网站列出了MCP服务器,包括:
这些目录允许用户根据下载量、日期、星标和使用案例等各种标准对服务器进行排序。每个条目都提供了诸如功能、工具和配置说明等信息。
-
PulseMCP: 该网站有一篇博客文章讨论了AI如何使用MCP服务器使网站过时。PulseMCP还包括一个关于MCP服务器的FAQ部分:https://www.pulsemcp.com/
使用Cline构建
-
启动过程: 向Cline提供以下信息:
- GitHub仓库URL: 服务器仓库的URL。
- README.md内容: 这是可选的,但有助于Cline了解服务器的用途和配置。您可以从GitHub仓库复制README.md文件。
-
与Cline的示例交互:
用户: "Cline,我想添加用于Brave浏览器控制的MCP服务器。这是GitHub链接:https://github.com/modelcontextprotocol/servers/tree/main/src/brave 你能添加它吗?"

Cline: "好的。将仓库克隆到MCP目录。因为它有一个'package.json'文件,所以需要构建。我应该运行'npm run build'吗?"

用户: "是的,构建它。"

Cline: "构建完成。这个服务器需要一个浏览器路径。你的Brave浏览器可执行文件在哪里?"

用户: "它在'/Applications/Brave Browser.app/Contents/MacOS/Brave Browser'。"

Cline: "好的。我已经用该路径更新了服务器配置,并将其添加到'cline_mcp_settings.json'中。还有其他事情吗?"

用户: "没有了,就这样。让我们测试一下。"

Cline: "太好了!启动MCP检查器以测试服务器连接。之后,我们可以尝试从Cline控制浏览器。"
-
Cline的操作: 根据您的指示,Cline将执行以下操作:
- 仓库克隆: Cline将仓库克隆到您的本地机器,通常在您的配置中指定的目录中。
- 调整: 您可以指导Cline修改服务器的配置。例如:
- 用户: “这个服务器需要一个API密钥。你能找到它应该添加在哪里吗?”
- Cline可能会根据您的指示自动更新
cline_mcp_settings.json文件或其他相关文件。
- 构建服务器: Cline将运行适当的构建命令,通常是
npm run build。
- 将服务器添加到设置: Cline会将服务器的配置添加到
cline_mcp_settings.json文件中。
测试和故障排除
- 测试服务器: 一旦Cline完成构建过程,测试服务器以确保其按预期工作。如果遇到任何问题,Cline可以协助您。
- MCP检查器: 您可以使用MCP检查器来测试服务器的连接和功能。
最佳实践
- 了解基础知识: 虽然Cline简化了流程,但了解服务器代码、MCP协议()以及如何配置服务器的基本知识是有益的。这有助于更有效地进行故障排除和定制。
- 清晰的指示: 在整个过程中向Cline提供清晰具体的指示。
- 测试: 在安装和配置后彻底测试服务器以确保其正常运行。
- 版本控制: 使用版本控制系统(如Git)来跟踪服务器代码的更改。
- 保持更新: 保持您的MCP服务器更新,以受益于最新的功能和安全补丁。
2.6.4 - 构建自定义MCP服务器
本指南提供了使用Cline的强大AI功能从头开始构建自定义MCP(模型上下文协议)服务器的全面教程。示例将构建一个“GitHub助手服务器”来说明该过程。
使用Cline从头开始构建自定义MCP服务器:全面指南
本指南提供了使用Cline的强大AI功能从头开始构建自定义MCP(模型上下文协议)服务器的全面教程。示例将构建一个“GitHub助手服务器”来说明该过程。
理解MCP和Cline在构建服务器中的作用
什么是MCP?
模型上下文协议(MCP)充当大型语言模型(LLMs)(如Claude)与外部工具和数据之间的桥梁。MCP由两个关键组件组成:
- MCP主机: 这些是与LLMs集成的应用程序,例如Cline、Claude Desktop等。
- MCP服务器: 这些是专门设计的小程序,通过MCP向LLMs暴露数据或特定功能。
这种设置在您拥有MCP兼容的聊天界面(如Claude Desktop)时非常有用,然后可以利用这些服务器访问信息并执行操作。
为什么使用Cline创建MCP服务器?
Cline通过利用其AI功能简化了构建和集成MCP服务器的过程:
- 理解自然语言指令: 您可以以自然的方式与Cline交流,使开发过程直观且用户友好。
- 克隆仓库: Cline可以直接从GitHub克隆现有的MCP服务器仓库,简化使用预构建服务器的过程。
- 构建服务器: 一旦必要的代码就位,Cline可以执行诸如
npm run build之类的命令来编译和准备服务器以供使用。
- 处理配置: Cline管理MCP服务器所需的配置文件,包括将新服务器添加到
cline_mcp_settings.json文件中。
- 协助故障排除: 如果在开发或测试过程中出现错误,Cline可以帮助识别原因并提出解决方案,使调试更容易。
使用Cline构建GitHub助手服务器:分步指南
本节演示如何使用Cline创建一个GitHub助手服务器。该服务器将能够与GitHub数据交互并执行有用的操作:
1. 定义目标和初始需求
首先,您需要向Cline清楚地传达服务器的目的和功能:
- 服务器目标: 告诉Cline您想构建一个“GitHub助手服务器”。指定该服务器将与GitHub数据交互,并可能提到您感兴趣的数据类型,如问题、拉取请求和用户配置文件。
- 访问需求: 让Cline知道您需要访问GitHub API。解释这可能需要一个个人访问令牌(GITHUB_TOKEN)进行身份验证。
- 数据特异性(可选): 您可以可选地告诉Cline您想从GitHub提取的特定数据字段,但这也可以在定义服务器工具时稍后确定。
2. Cline启动项目设置
根据您的指示,Cline启动项目设置过程:
- 项目结构: Cline可能会询问您服务器的名称。之后,它使用MCP
create-server工具为您的GitHub助手服务器生成基本项目结构。这通常涉及创建一个包含package.json、tsconfig.json和用于TypeScript代码的src文件夹的新目录。 \
- 代码生成: Cline为您的服务器生成启动代码,包括:
- 文件处理实用程序: 帮助读写文件的函数,通常用于存储数据或日志。 \
- GitHub API客户端: 与GitHub API交互的代码,通常使用
@octokit/graphql等库。Cline可能会询问您的GitHub用户名或您想使用的仓库。 \
- 核心服务器逻辑: 处理来自Cline的请求并将其路由到适当函数的基本框架,如MCP所定义。 \
- 依赖管理: Cline分析代码并识别必要的依赖项,将它们添加到
package.json文件中。例如,与GitHub API交互可能需要@octokit/graphql、graphql、axios或类似的包。 \
- 依赖安装: Cline执行
npm install以下载并安装package.json中列出的依赖项,确保您的服务器拥有所有必需的库以正常运行。 \
- 路径修正: 在开发过程中,您可能会移动文件或目录。Cline智能地识别这些变化并自动更新代码中的文件路径以保持一致性。
- 配置: Cline将修改
cline_mcp_settings.json文件以添加您的新GitHub助手服务器。这将包括:
- 服务器启动命令: Cline将添加适当的命令来启动您的服务器(例如
npm run start或类似的命令)。
- 环境变量: Cline将添加所需的
GITHUB_TOKEN变量。Cline可能会询问您的GitHub个人访问令牌,或者它可能会指导您将其安全地存储在单独的环境文件中。 \
- 进度文档: 在整个过程中,Cline保持“记忆库”文件的更新。这些文件记录了项目的进度,突出显示已完成的任务、进行中的任务和待处理的任务。
3. 测试GitHub助手服务器
一旦Cline完成设置和配置,您就可以测试服务器的功能:
- 使用服务器工具: Cline将在您的服务器中创建各种“工具”,代表操作或数据检索功能。要测试,您可以指示Cline使用特定工具。以下是与GitHub相关的示例:
get_issues: 要测试检索问题,您可能会对Cline说:“Cline,使用GitHub助手服务器中的get_issues工具向我展示’cline/cline’仓库中的未解决问题。” Cline将执行此工具并向您展示结果。get_pull_requests: 要测试拉取请求检索,您可以要求Cline“使用get_pull_requests工具向我展示’facebook/react’仓库中上个月合并的拉取请求。” Cline将执行此工具,使用您的GITHUB_TOKEN访问GitHub API,并显示请求的数据。 \
- 提供必要信息: Cline可能会提示您提供执行工具所需的额外信息,例如仓库名称、特定日期范围或其他过滤条件。
- Cline执行工具: Cline处理与GitHub API的通信,检索请求的数据,并以清晰易懂的格式呈现。
4. 完善服务器并添加更多功能
开发通常是迭代的。当您使用GitHub助手服务器时,您会发现要添加的新功能或改进现有功能的方法。Cline可以协助这一持续过程:
- 与Cline讨论: 与Cline讨论您对新工具或改进的想法。例如,您可能想要一个
create_issue工具或get_user_profile工具。与Cline讨论这些工具所需的输入和输出。
- 代码完善: Cline可以帮助您编写新功能所需的代码。Cline可以生成代码片段,建议最佳实践,并帮助您调试出现的任何问题。
- 测试新功能: 添加新工具或功能后,您将再次使用Cline进行测试,确保它们按预期工作并与服务器的其余部分良好集成。
- 与其他工具集成: 您可能希望将您的GitHub助手服务器与其他工具集成。例如,在“github-cline-mcp”源代码中,Cline协助将服务器与Notion集成,以创建一个跟踪GitHub活动的动态仪表板。 \
通过遵循这些步骤,您可以使用Cline从头开始创建自定义MCP服务器,利用其强大的AI功能来简化整个过程。Cline不仅协助构建服务器的技术方面,还帮助您思考设计、功能和潜在集成。
2.7 - 自定义
Cline 自定义指南
.clineignore 支持
为了给您更多控制权,决定哪些文件可以被Cline访问,我们实现了.clineignore功能,类似于.gitignore。这允许您指定Cline不应访问或处理的文件和目录。这在以下情况下非常有用:
- 隐私: 防止Cline访问工作区中的敏感或私人文件。
- 性能: 排除与任务无关的大型目录或文件,可能提高Cline的效率。
- 上下文管理: 将Cline的注意力集中在项目的相关部分。
如何使用.clineignore
-
创建.clineignore文件: 在您的工作区根目录(与.vscode文件夹同级,或在VS Code中打开的顶级文件夹)中,创建一个名为.clineignore的新文件。
-
定义忽略模式: 打开.clineignore文件并指定您希望Cline忽略的文件和目录的模式。语法与.gitignore相同:
示例.clineignore文件:
# 忽略日志文件
*.log

# 忽略整个'node_modules'目录
node_modules/

# 忽略'temp'目录及其子目录中的所有文件
temp/**

# 但不要忽略根目录中的'important.log'
!important.log

# 忽略任何子目录中名为'secret.txt'的文件
**/secret.txt
-
Cline尊重您的.clineignore: 一旦您保存了.clineignore文件,Cline将自动识别并应用这些规则。
- 文件访问控制: Cline将无法使用
read_file等工具读取被忽略文件的内容。如果您尝试在忽略的文件上使用工具,Cline将告知您由于.clineignore设置,访问被阻止。
- 文件列表: 当您要求Cline列出目录中的文件时(例如使用
list_files),被忽略的文件和目录仍会被列出,但它们旁边会标记一个🔒符号,表示它们被忽略。这有助于您了解Cline可以和不与之交互的文件。
-
动态更新: Cline会监控您的.clineignore文件的更改。如果您修改、创建或删除.clineignore文件,Cline将自动更新其忽略规则,而无需重新启动VS Code或扩展。
总结
.clineignore文件提供了一种强大而灵活的方式来控制Cline对工作区文件的访问,增强了隐私、性能和上下文管理。通过利用熟悉的.gitignore语法,您可以轻松地将Cline的注意力集中在项目中最相关的部分。
3 - SmartCode AI编码助手
SmartCode AI编码助手是一款基于人工智能的编码助手,能够帮助开发者提高编码效率,减少重复劳动,提升代码质量。
3.1 - JetBrains插件
SmartCode 为使用 JetBrains 全系列IDE的开发者提供的简单易用的AI编程助手插件,支持IntelliJ IDEA, PyCharm, GoLand, Rider, PhpStorm, WebStorm和Andriod Studio全系列JetBrains IDE。提供多种开发语言,Java、Kotlin、Python、Go、C#等的支持。提供智能代码补全、智能代码生成、智能代码重构、智能代码导航、智能代码分析等功能,帮助开发者提升编码效率,降低编码成本,提高代码质量。
3.1.1 - 代码补全
SmartCode AI编码助手是一款基于人工智能的编码助手,能够帮助开发者提高编码效率,减少重复劳动,提升代码质量。
单行补全
单行补全模式 可用于属性生成、参数补全、变量赋值 等场景。


多行补全
在实际开发场景中,特别是在写一个新的方法/函数时,每个开发人员的诉求往往是不同的。
- 某些场景下开发人员希望给一个方法名字,或者一个简单的注释补全工具就可以给我们自动生成整个方法的业务逻辑。
- 某些场景下我们希望给一个方法名字,然后补全工具在方法里能够逐行的给予补全,这样开发人员可以进行快速的修正,然后补全插件根据修正后的内容,继续给予补全建议。那么这种场景下就需要具备单行/多行补全的切换能力。
通过单行/多行补全开发人员可以根据自己的场景快速的切换补全模式。实现高效开发。
点击右下角的 补全模式

点击后,S(Single Line)会切换为M(MultiLine),如下图所示:

按tab键接受代码,继续回车,如下图所示:

方法级代码补全


手工触发
插件默认是自动触发补全,有时候开发人员在进行代码编写时,不管是开发人员在打字时、空格时、回车时默认都会触发代码自动补全。这样很大程度上会干扰开发人员的正常开发,所以很多开发人员希望关闭自动补全,而是通过手工快捷键触发的方式来进行补全,这样开发人员可以真正做到随叫随到的补全效果。
设置手工触发补全
3.1.2 - 代码对话
自动识别用户IDE环境中的代码上下文,结合AISE后台提供的RAG能力,提供实时代码建议。
按 Tab 或单击“接受”以应用代码建议。

SmartCode支持3种代码片段选择方式,如 代码解释 中所示,分为以下入口:
- 右键快捷菜单
- CodeLens
- #selection 变量
代码解释
代码解释能力允许开发人员选择代码片段,通过大模型对代码进行自然语言解释。
下图:使用右键快捷菜单调用 代码解释 特性

下图:使用codelens(方法体悬浮菜单)方式调用 代码解释 特性


下图:使用 #selection 变量自定义 代码解释 提示词

代码评审
使用右键快捷菜单调用 代码评审 特性

生成测试
根据用户选择代码自动生成单元测试用例,并提供较为丰富的测试覆盖能力。

生成注释
为方法体提供顶部注释生成能力

代码检查
允许用户提供自定义代码检查规则,通过快捷方式触发。

多轮对话
支持用户与AI进行连续、多轮的技术对话交流,对话时保持上下文连贯性。
下图展示了多轮对话能力,用户在完成前一轮对话后,可以通过文字语意,比如:这段/以上/前面的,这样的说法提示SmartCode关注前文内容,保持对话的连贯性。

3.2 - Visual Studio插件
SmartCode 为使用 Visual Studio(2019、2022)IDE的开发者提供的简单易用的AI编程助手插件,基于华为盘古研发大模型的智能开发助手,重塑了智能化软件研发的新范式,让开发者更加聚焦业务创新,事半功倍。插件基于智能生成、智能问答两大核心能力,覆盖了代码生成、研发知识问答、单元测试用例生成、代码解释、代码注释、代码调试、代码翻译、代码检查等开发场景,释放软件研发生产力。
应用场景
代码智能推荐与补全
- 高效编写新代码:在编写代码时,代码助手能够基于对代码上下文的理解,实时推荐相关的代码片段、函数、变量名等。例如,当用户在编写一个循环结构时,它会推荐常用的循环语法和相关函数,帮助用户快速完成代码的编写,提高编码速度和准确性。
- 减少重复劳动:对于一些常用的代码模式,如条件判断、异常处理等,代码助手可以自动补全代码,避免重复编写相同的代码,节省时间和精力。
- 多行代码推荐:除了单行代码补全,代码助手还支持多行代码推荐。例如,在编写一个复杂的算法或函数时,它可以根据用户的意图和上下文,推荐完整的代码块,帮助用户快速构建代码逻辑。
代码快速熟悉与理解
- 功能与逻辑快速理解:当接手新的项目或研究开源代码时,代码助手可以从功能、目的、使用场景和主要逻辑多个维度帮助用户快速理解代码、复杂数据结构与算法分析。例如,在阅读一个复杂的系统代码时,代码助手可以详细解释其功能和实现逻辑。
- 解读非标准化代码和注释:有时候,用户可能会遇到一些非标准化的代码或没有详细注释的代码。代码助手可以解读这些代码,提供通俗易懂的注释和说明,帮助用户理解代码的意图和功能。例如,在一些历史遗留代码中,可能存在一些晦涩难懂的代码,代码助手会解释这些代码的功能、目的、使用场景和主要逻辑。
代码调试与优化
- 快速定位代码错误:在代码运行报错时,代码助手通过分析堆栈信息和代码逻辑,能够快速定位代码中的错误和异常。例如,当运行代码报错时,在报错处单击代码助手图标,它会根据堆栈信息自动识别出可能导致问题的代码行或模块,并提供相关的上下文信息和建议,帮助用户快速找到错误根源,节省调试时间。
- 性能优化建议:代码助手能够分析代码的性能瓶颈,提供优化建议。例如,当用户检查代码时,它会识别出可能导致性能问题的代码片段,如低效的循环、不必要的计算等,并建议用户使用更高效的算法或数据结构来优化代码,提高程序的运行速度和响应能力。
- 代码可读性与可维护性优化:代码助手可以帮助用户提高代码的可读性和可维护性。例如,它会根据代码的结构和逻辑,建议用户对代码进行优化,如简化复杂的逻辑、提取重复的代码片段、增强注释和文档的清晰度等,使代码更加简洁、易读和易维护,降低后续代码修改和扩展的难度。
单元测试用例生成
- 功能验证测试用例生成:在编写新功能或修改现有功能时,代码助手可以基于代码实现自动为功能模块创建单元测试用例。例如,当用户编写一个处理用户登录的函数时,它会生成涵盖正常登录、无效用户名、错误密码等各种情况的测试用例,确保函数行为的正确性。
- 边界条件测试用例生成:代码助手能够识别代码中的边界条件,比如数组为空、字符串为空或达到最大长度等情况,并自动生成相应的测试用例。这些测试用例有助于检测代码在极端情况下的健壮性,提前发现潜在的边界问题。
- 异常处理测试用例生成:在开发过程中,异常处理是容易被忽略但又非常关键的环节。代码助手会根据代码逻辑,自动为可能引发异常的代码路径生成测试用例,如模拟网络错误、数据库连接失败等场景,确保代码能够正确捕获和处理异常。
- 高质量测试用例生成:代码助手能够分析代码逻辑和业务需求,生成既覆盖正常情况又兼顾异常场景的高质量测试用例。例如,对于一个电商网站的购物车功能,它会生成测试用例来验证添加商品、更新商品数量、删除商品等操作在不同条件下的正确性,以及应对库存不足、价格变更等异常情况的能力。
功能特性
- 支持多种编程语言,并能根据开发者键入的函数签名和注释自动生成函数体。
- 支持根据行级注释或代码上下文信息自动生成与描述场景匹配的代码。
- 可根据开发者当前光标位置的前后语句片段进行代码填空和补全。
- 支持跨文件生成与任务相关的代码。
- 支持从功能、目的和实现逻辑三个维度对代码进行解释说明。
- 可根据用户需求内容生成行级、函数级注释信息,能够帮助开发人员高效补充代码注释。
- 可根据输入的代码和错误信息,得到错误原因并给出修复方案。
- 支持生成高覆盖率的单元测试代码,包括单个方法和类级别的单元测试框架代码。
- 可根据提问来检索研发相关知识,提供答案。
- 支持对代码进行函数级检查功能,可及时、主动发现编码缺陷,提升代码质量和安全性。
- 支持代码翻译,可以指出不同语言关键元素差异,帮助开发者适应新环境
3.2.1 - 使用代码助手生成代码
代码助手支持通过快捷键在IDE中触发根据代码上下文生成代码,也可以在研发对话窗口使用代码注释或自然语言描述生成代码。
使用快捷键通过上下文生成代码
1、打开一个c#文件,将编辑光标移动至需要生成代码位置,按下快捷键“Alt+C”。

2、代码助手将根据上下文生成代码,按下Tab键可接受代码助手生成代码内容。

通过问答生成代码
1、在研发对话窗口输入框中输入生成代码需求,如:“C#冒泡排序”,单击研发对话窗口输入框右下角 按钮发送。
按钮发送。
2、代码助手将在研发对话窗口中生成Java冒泡排序代码。

3、单击输入框右上角 可以将对话内容归档并新建会话,单击研发对话窗口右上角
 可以查看历史提问。
4、对代码助手生成的代码块,可以进行如下操作:
- 单击
 复制代码。
复制代码。
- 单击
 在当前光标位置插入代码。
- 单击
 将代码另存为文件。
5、对代码助手回答的内容,可以进行如下操作:
- 单击
 可以针对提问重新生成结果。
- 单击
 可以复制回答内容。
- 单击
 对回答满意。
- 单击
 对回答不满意。
3.2.2 - 使用代码助手解释代码
如果开发人员对代码存在疑惑,可以使用代码助手代码解释功能自动分析代码的结构和逻辑,对代码功能进行解释,帮助开发人员理解代码的功能和实现方式。
通过问答功能解释代码
1、选中示例代码中“true”方法代码,单击右键,选择菜单“CodeArts 盘古助手:Add to Chat”或使用快捷键Ctrl+Shift+X将代码添加至研发对话窗口。
2、在研发对话窗口输入框中输入“/”,在弹出菜单中选择“/explain”,或单击研发对话窗口中“Code Explain”,单击 发送。
发送。
3、代码助手将对代码进行解释,通过文字描述帮助开发人员理解代码。针对本次选中的代码,代码助手给的解释是:这段代码的主要功能是对一个整型数组进行排序。它使用了冒泡排序算法,这是一种简单但效率较低的排序算法。

3.2.3 - 使用代码助手注释代码
代码开发完成后,使用代码助手代码注释功能可以为代码添加详细的注释说明,包括函数、变量、类的作用、参数、返回值信息,帮助开发人员更好地理解代码逻辑和实现方式,提高代码可读性和可维护性,同时也方便后续的代码维护和修改工作。
注释代码
1、选中示例代码,单击右键,选择菜单“CodeArts 盘古助手:Add to Chat”或使用快捷键Ctrl+Shift+X将代码添加至研发对话窗口。
2、在研发对话窗口输入框中输入“/”,在弹出菜单中选择“/comment”或单击研发对话窗口中“Code Comment”,单击 发送。
发送。
3、代码助手将对代码进行注释,通过文字描述帮助开发人员理解代码。

3.2.4 - 研发知识问答
在代码助手研发对话窗口中,用户可以随时提出问题,而系统则会快速检索研发相关知识,并提供匹配答案,从而帮助用户高效地解决问题。
研发知识问答
1、在研发对话窗口中输入研发相关问题“生成一段读取文本内容代码”。
2、代码助手将使用Python或其他语言生成一段读取文本内容的代码。
3.2.5 - 常见问题
在使用代码助手过程中遇到的常见问题及处理方式。
3.2.5.1 - 代码助手提示“代码生成暂无结果”
使用代码助手生成代码时,研发对话窗口或IDE右下角提示“代码生成暂无结果”
问题现象
使用代码助手生成代码时,研发对话窗口或IDE右下角提示“代码生成暂无结果”。
可能原因
代码助手对当前代码上下文生成代码暂无结果。
解决办法
重新触发代码生成或切换至代码中其他位置触发代码生成。
3.2.5.2 - 使用代码助手时提示“请登录后再使用”
问题现象
使用代码助手功能时,研发对话窗口或IDE弹出提示“请登录后再使用”。
可能原因
解决办法
使用研发对话窗口登录账号,或通过系统菜单“扩展”中的“登录”子菜单进行登录账号。
3.2.5.3 - 代码助手提示“授权已经过期”
使用代码助手功能时,研发对话窗口上方提示“您的试用已经过期,请联系客户成功处理。”或“您的试用有效期已不足x天,请联系客户成功处理。”
问题现象
- 使用代码助手功能时,研发对话窗口上方提示“您的试用已经过期,请联系客户成功处理。”。
- 使用代码助手功能时,研发对话窗口上方提示“您的试用有效期已不足x天,请联系客户成功处理。”。
可能原因
- 您的使用许可已到期。
- 您的使用许可只剩x天有效期。
解决办法
通过华为云商店重新购买插件使用许可,或联系华为云商店客服处理。
3.3 - 支持使用#变量
对话变量用于在对话时引用IDE中的代码内容,为用户提供更加灵活的提示词组织方式。本次提供3个对话变量:
#selection: 用于引用当前激活的编辑器中已经选中的代码#editor:用于引用当前激活编辑器中的任何代码块#file:用于选择文件
通过使用 对话变量 开发者可以实现一些之前不容易实现的提示词,比如:开发者可以通过以下提示词引用某个文件内容,并要求AI将所引用的代码作为参考进行生成,示例如下:
- 请根据这个文件中的内容
#file:BankTransactionController.java 生成API文档,并使用标准的markdown格式输出。
- 请参考
#file:Dockerfile 编写一个 docker-compose.yaml 并将对外端口设置为8090,并将日志映射到本地路径中
- 请对
#selection 进行分析,重点关注其中可能存在的代码安全问题,并提供解决方案和示例代码
用户也可以组合以上变量,构建出更加复杂的提示词,比如:
- 请参考
#file:api_reference.yaml,修正以下代码中的接口调用逻辑 #selection
- 请参考
#editor:model.py77-89,生成10个单元测试,尽量覆盖各种场景
各类变量的具体调用方式
-
打开SmartCode,在对话输入框点击“#”或者输入“#”,调起#变量

-
#selection变量用于在提示词中引入当前活动编辑器中被选中的代码内容
-
使用#editor变量,用于在当前编辑中选择不同的代码库,系统会提示选择类、方法等不同的代码块
-
使用#file变量可以引入当前项目中的任意文件,包括已经开启和未开启的。


4 - SmartChat 企业级ChatGPT服务
SmartChat 为企业用户提供了一个基于浏览器的ChatGPT聊天工具,用户可以通过这个工具与各种AI模型进行智能对话,并且支持自定义AI助理、自定义提示词、多模态图片识别、文档对话和知识库对话等特性。
4.1 - 图表生成
Mermaid Markdown 是一种使用 Markdown 语法来创建图表和流程图的工具。Mermaid 是一个基于 JavaScript 的图表绘制工具,它允许用户通过简单的文本描述来生成复杂的图表。在本次的AISE更新中,SmartChat浏览器中开始支持对模型生成的符合Mermaid语法的markdown内容继续宁动态解析,显示成图表。
使用场景
场景1 - 使用Mermaid生成思维导图
- SmartChat Web端,对话使用Mermaid生成思维导图,可以使用以下提示词内容
使用mermaid生成一个说明devops知识体系的思维导图,请确保输出的mermaid markdown符合格式规范。

- 点击“预览”,查看Mermaid生成的思维导图


- Mermaid生成的思维导图点击“放大”,放大的图片可以进行放大、缩小、翻转


- Mermaid生成的思维导图进行“下载”


场景2 - 使用Mermaid生成一个序列图
- SmartChat Web端,对话使用Mermaid生成序列图,可以使用以下提示词
使用Mermaid生成一个序列图来说明银行中的存款流程,其中有4个角色: 客户 柜员员工 分行经理 银行系统

- 点击“预览”,查看Mermaid生成的序列图


场景3 - 使用mermaid生成可视化ER图
- SmartChat Web端,对话使用Mermaid生成可视化ER图,可以使用以下提示词
分析以下sql语句的内容,使用mermaid可视化ER图展示其中所涉及的表和他们之间的关联;直接生成ER图,不要其他文字解释

SELECT employee_id, department_name, l.city, e.department_id, l.location_id
FROM employees e, departments d, locations l
WHERE e.department_id = d.department_id
AND d.location_id = l.location_id ;

- 点击“预览”,查看Mermaid生成的可视化ER图

场景4 - 使用Mermaid Markdown格式对代码直接输出
- 代码直接使用Mermaid Markdown格式输出,可是使用以下提示词
直接输出以下内容,使用mermaid markdown格式

    gitGraph
        commit id: "1"
        commit id: "2"
        branch nice_feature
        checkout nice_feature
        commit id: "3"
        checkout main
        commit id: "4"
        checkout nice_feature
        branch very_nice_feature
        checkout very_nice_feature
        commit id: "5"
        checkout main
        commit id: "6"
        checkout nice_feature
        commit id: "7"
        checkout main
        merge nice_feature id: "customID" tag: "customTag" type: REVERSE
        checkout very_nice_feature
        commit id: "8"
        checkout main
        commit id: "9"

- 点击“预览”,查看Mermaid生成的git图


场景5 - explain_chat 提示词
explain_chat 是本次版本更新中新提供的提示词,可以针对某段代码生成对应的流程图和时序图,帮助开发人员可视化的理解代码结构。
- 在SmartChat Web中输入 /explain_chat 即可调出词提示词的输入界面,在其中输入 代码语言 类型和代码内容

- 点击 Submit 后即可以完成对应的流程图和时序图的生成,对于以下示例代码所生成的图如下
示例代码:
    public boolean insert(String word) {
        TrieNode current = root;
        for (char c : word.toCharArray()) {
            if (!current.hasChild(c)) {
                current.children.put(c, new TrieNode(c));
            }
            current = current.children.get(c);
        }
        if (current.isEndOfWord) {
            return false;
        }
        current.isEndOfWord = true;
        return true;
    }
流程图

时序图

4.2 - 图片识别
在SmartChat中上传图像,针对图像内容进行理解,解析和内容生成。
激活图片识别能力
图片识别能力的激活需要在管理后台完成2项配置,分别是:开启特性开关和配置GPT-4o模型。
1.首先,管理人员需要确保在 参数设置 中开启使用人 chat-data-v2 和 chat_image 两个特性的权限;这2个特性开关可以完全开启或者为指定人员或者部门开启(部门和人员只能二选一)。

2.需要在模型适配器中增加GPT-4o模型,并确保模型类型指定为:completion_azure_gpt4_vision。

3.最后,确保在 参数设置中的 aise.model.config.default 配置中包含 “image_model_type”: “completion_azure_gpt4_vision” 配置内容

使用场景
1.在web页面中,用户可点击输入框右下角的图标,在弹出的页面中选择图片进行上传。

2.选择图片后,可在输入框中对图片进行描述、提问等。

3.发送图片和问题,模型将对图片进行识别并回答问题。

5 - Code Review Agent 代码评审智能体
代码评审智能体(Code Review Agent)是利用生成式AI技术实现的自动化代码评审功能,它可以自动扫描用户提交的代码变更,生成概要性描述或者评审意见,也可以接收用户的提问并根据代码变更内容给出答案。代码评审智能体旨在为参与代码评审的团队成员提高工作效率,特别是在面对改动量比较大的评审任务时,使用代码评审智能体可以大幅节省评审者用来阅读代码/理解代码的时间,同时也可以帮助被评审者提供可能的修复建议。
5.1 - 启用和配置
介绍如何在 DevOps 环境中配置和使用 Code Review Agent 代码评审智能体。包括了了从部署智能体、大模型配置、设置模型访问参数、添加 Webhook、启用智能体以及测试验证的完整流程。
服务端配置
要使用 Code Review Agent,管理员首先需要在服务端添加可用的大模型API访问地址,并配置模型访问参数。当前支持的模型包括
- GPT系列模型:支持
gpt-3.5-turbo-16k、gpt-4、gpt-4o,并支持使用 OpenAI 或者 Azure OpenAI 服务。
- DeepSeek系列模型:支持
deepseek api服务、 deepseek v2 16b,并支持使用自建的模型API服务,包括使用Nvidia GPU或者华为晟腾910B等硬件平台。
有关模型部署和推理服务的更多信息,请联系部署实施人员。
配置大模型
默认模型为 gpt-3.5-turbo-16k,常用的模型还包括:gpt-4o 和 deepseek/deepseek-chat ,如果需要使用其他模型,请联系部署实施人员来修改。
# pr_agent\settings\configuration.toml
[config]
model="gpt-3.5-turbo-16k"
model_turbo="gpt-3.5-turbo-16k"
fallback_models=["gpt-3.5-turbo-16k"]
配置模型访问参数
以下是 在 .secrets.toml 中 Azure OpenAI 的配置示例:
[openai]
key = "<OpenAI API key>"
api_type = "azure"
api_version = '2023-03-15-preview'
api_base = "<endpoint url>"
deployment_id = "<your deployment_id>"
以下是 在 .secrets.toml 中 deepseek 的配置示例:
[openai]
key = "<model key>"
api_base = "<model api endpoint>"
DevOps 平台支持
Code Review Agent 代码评审智能体 支持多种 DevOps 平台,包括 Azure DevOps、GitLab 等。当前我们已经提供对 Azure DevOps 平台的的支持,对于GitLab 平台的支持正在适配中,末未正式支持后我们会补充这部分的文档。
Azure DevOps 配置
目前 Code Review Agent 代码评审智能体 已支持 Azure DevOps Servies和Azure DevOps Server的集成。
在使用前需要先配置好webhook, 目前使用到了两个webhook,一个是创建PR事件和提交PR Comment事件。
另外还需配置启用的 Azure DevOps 机构。
获取访问token
需要配置用于Code Review Agent 调用 Azure DevOps API 的 访问 token(pat)。
Azure DevOps 支持2种第三方服务认证方式,分别为:PAT 令牌 或 DefaultAzureCredential 认证(仅适用于Azure DevOps 在线服务)。
- PAT 创建速度更快,并有内置的到期日期,,PAT需要附属于某个真实用户,需要用户对PAT的过期时间进行小心的维护,否则额很容易出现因为PAT过期而影响使用的情况。
- 使用 DefaultAzureCredential,可以使用托管身份或服务主体,安全性更好,并且会为代理创建单独的 ADO 用户身份(通过 AAD);但创建过程复杂,而且仅适用于 Azure DevOps 在线服务)。
如果选择了 PAT,您可以在 .secrets.toml 中分配该值。如果选择了 DefaultAzureCredential,您可以直接分配 AZURE_CLIENT_SECRET 等额外的环境变量。
以下是 .secrets.toml 的配置示例:
[azure_devops]
# For Azure devops personal access token
org = "<azure devops org or collection>"
pat = "<pat>"
设置服务访问用户和密码
要在 Azure DevOps 中通过 Service Hook 调用 Code Review Agent,首先我们需要配置或者获取 .secrets.toml 中的访问用户名和密码。
以下是 .secrets.toml 文件中的配置示例,您剋打开这个我文件,修复并记录其中的 webhook_username 和 webhook_password,在后续的配置中需要用到。
## in # pr_agent/settings/.secrets.toml 中
[azure_devops_server]
webhook_username = "<basic auth user>" #default value is aisedevpr
webhook_password = "<basic auth password>" #default password is <TO BE Fill>
确保 webhook 端点仅通过 HTTPS 访问,以降低使用基本身份验证时凭据被拦截的风险。
Code Review Agent提供和api支持基本认证和匿名访问(不需要认证)两种模式,前者适用于外网环境,后者适用于内网环境。如果想采用匿名方式(无认证),只里面要把
在 .secrets.toml中,对整个节点注释(或者删除)即可.
# [azure_devops_server]
# webhook_username = "<basic auth user>"
# webhook_password = "<basic auth password>"
另外azure devops 的webhook配置那里帐号和密码留空即可,修改完后需要重启 Code Review Agent 服务才能生效。
配置Service Hook
使用Code Review Agent之前需要在Azure DevOps对应的团队项目(Team Project)中配置对应的Web Hook,所需要配置的Web Hook主要有两个。
- Pull Request created: 当PR创建的时候自动触发
- Pull request commented on:当PR上被用户添加了新的评论的时候触发
Web Hooks 配置界面如图:

Web Hook 的具体配置参数如下
- URL:需要只想当前的 /workspace-api/pragent/
- 认证方式中的用户名和密码可以在我们提供的物料中获取

完成以上配置后,Code Review Agent 就可以正常工作了。
5.1.1 -
Local configuration file
By uploading a local .pr_agent.toml file to the root of the repo’s main branch, you can edit and customize any configuration parameter. Note that you need to upload .pr_agent.toml prior to creating a PR, in order for the configuration to take effect.
For example, if you set in .pr_agent.toml:
[pr_reviewer]
extra_instructions="""\
- instruction a
- instruction b
...
"""
Then you can give a list of extra instructions to the review tool.
All Code Review Agent tools have a parameter called extra_instructions, that enables to add free-text extra instructions. Example usage:
/update_changelog --pr_update_changelog.extra_instructions="Make sure to update also the version ..."
Working with large PRs
TODO
Changing a model
TODO
By default, around any change in your PR, git patch provides three lines of context above and below the change.
@@ -12,5 +12,5 @@ def func1():
 code line that already existed in the file...
 code line that already existed in the file...
 code line that already existed in the file....
-code line that was removed in the PR
+new code line added in the PR
 code line that already existed in the file...
 code line that already existed in the file...
 code line that already existed in the file...
For the review, describe, ask and add_docs tools, if the token budget allows, Code Review Agent tries to increase the number of lines of context, via the parameter:
[config]
patch_extra_lines=3
Increasing this number provides more context to the model, but will also increase the token budget.
Code Review Agent automatically sets this number to 0, using the original git patch.
Editing the prompts
The prompts for the various Code Review Agent tools are defined in the pr_agent/settings folder.
In practice, the prompts are loaded and stored as a standard setting object.
Hence, editing them is similar to editing any other configuration value - just place the relevant key in .pr_agent.tomlfile, and override the default value.
For example, if you want to edit the prompts of the describe tool, you can add the following to your .pr_agent.toml file:
[pr_description_prompt]
system="""
...
"""
user="""
...
"""
Note that the new prompt will need to generate an output compatible with the relevant post-process function.
5.2 - 指令参考
Code Review Agent 代码评审智能体 提供了一系列的命令来辅助开发团队进行代码评审,帮助团队更快速的理解代码变更,提升代码合并效率。文档提供目前版本可用的命令,每个命令都有一个详细的页面来使用方式,还包括一些核心参数的配置说明。
指令参考
当前 Code Review Agent 所支持的指令内容如下,我们持续改进现有指令的生成效果并根据需要持续添加新的指令内容:
/summary: 生成PR描述,创建PR时会自动生成,也可以手工执行。/review:触发代码审查并提供反馈。/ask [问题]:提出具体问题并获取回答。/update_changelog:自动生成并更新变更日志。/generate_labels:自动生成标签,并添加到当前PR中
5.2.1 -
Overview
The summary(same with describe) tool scans the PR code changes, and generates a description for the PR - title, type, summary, walkthrough and labels.
The tool can be triggered automatically every time a new PR be created, or it can be invoked manually by commenting on any PR:
Example usage
Manual triggering
Invoke the tool manually by commenting /describe on any PR:
![Describe comment]() {width=512}
{width=512}
After ~30 seconds, the tool will generate a description for the PR:
![Describe New]() {width=512}
{width=512}
If you want to edit configurations, add the relevant ones to the command:
/describe --pr_description.some_config1=... --pr_description.some_config2=...
Automatic triggering
To run the describe automatically when a PR is opened, define in a configuration file:
[azure_devops_server]
pr_commands = [
    "/describe",
    #"/review --pr_reviewer.num_code_suggestions=0",
    #"/update_changelog"
    #"/improve", #dont add this ,mabey has loop exec bug
]


[gitlab]
url = "https://gitlab.com" # URL to the gitlab service
pr_commands = [
    "/describe --pr_description.final_update_message=false",
    "/review --pr_reviewer.num_code_suggestions=0",
    "/improve",
]
handle_push_trigger = false
push_commands = [
    "/describe",
    "/review --pr_reviewer.num_code_suggestions=0",
]

[pr_description]
publish_labels = ...
...
- The
pr_commands lists commands that will be executed automatically when a PR is opened.
- The
[pr_description] section contains the configurations for the describe tool you want to edit (if any).
Configuration options
!!! example “Possible configurations”
| publish_labels |
If set to true, the tool will publish the labels to the PR. Default is true. |
| publish_description_as_comment |
If set to true, the tool will publish the description as a comment to the PR. If false, it will overwrite the original description. Default is false. |
| publish_description_as_comment_persistent |
If set to true and `publish_description_as_comment` is true, the tool will publish the description as a persistent comment to the PR. Default is true. |
| add_original_user_description |
If set to true, the tool will add the original user description to the generated description. Default is true. |
| generate_ai_title |
If set to true, the tool will also generate an AI title for the PR. Default is false. |
| extra_instructions |
Optional extra instructions to the tool. For example: "focus on the changes in the file X. Ignore change in ..." |
| enable_pr_type |
If set to false, it will not show the `PR type` as a text value in the description content. Default is true. |
| final_update_message |
If set to true, it will add a comment message [`PR Description updated to latest commit...`](pull/499#issuecomment-1837412176) after finishing calling `/describe`. Default is false. |
| enable_semantic_files_types |
If set to true, "Changes walkthrough" section will be generated. Default is true. |
| collapsible_file_list |
If set to true, the file list in the "Changes walkthrough" section will be collapsible. If set to "adaptive", the file list will be collapsible only if there are more than 8 files. Default is "adaptive". |
| enable_help_text |
If set to true, the tool will display a help text in the comment. Default is false. |
Markers template
To enable markers, set pr_description.use_description_markers=true.
Markers enable to easily integrate user’s content and auto-generated content, with a template-like mechanism.
For example, if the PR original description was:
User content...

## PR Type:
pr_agent:type

## PR Description:
pr_agent:summary

## PR Walkthrough:
pr_agent:walkthrough
The marker pr_agent:type will be replaced with the PR type, pr_agent:summary will be replaced with the PR summary, and pr_agent:walkthrough will be replaced with the PR walkthrough.
![Describe markers before]() {width=512}
{width=512}
→
![Describe markers after]() {width=512}
{width=512}
Configuration params:
use_description_markers: if set to true, the tool will use markers template. It replaces every marker of the form pr_agent:marker_name with the relevant content. Default is false.include_generated_by_header: if set to true, the tool will add a dedicated header: ‘Generated by Code Review Agent at …’ to any automatic content. Default is true.
Usage Tips
!!! tip “Automation”
- When you first install , the default mode for the describe tool is:
pr_commands = ["/describe", ...]
meaning the describe tool will run automatically when any PR be created, with the default configurations.
- Markers are an alternative way to control the generated description, to give maximal control to the user. If you set:
pr_commands = ["/describe --pr_description.use_description_markers=true", ...]
the tool will replace every marker of the form pr_agent:marker_name in the PR description with the relevant content, where marker_name is one of the following:
* type: the PR type.
* summary: the PR summary.
* walkthrough: the PR walkthrough.
- Note that when markers are enabled, if the original PR description does not contain any markers, the tool will not alter the description at all.
5.2.2 -
Overview
The review tool scans the PR code changes, and automatically generates a PR review.
The tool can be triggered automatically every time a new PR is opened, or can be invoked manually by commenting on any PR:
Example usage
Manual triggering
Invoke the tool manually by commenting /review on any PR:
 {width=512}
After ~30 seconds, the tool will generate a review for the PR:
 {width=512}
If you want to edit configurations, add the relevant ones to the command:
/review --pr_reviewer.some_config1=... --pr_reviewer.some_config2=...
Automatic triggering
To run the review automatically when a PR is opened, define in a configuration file:
[github_app]
pr_commands = [
    "/review",
    ...
]

[pr_reviewer]
num_code_suggestions = ...
...
- The
pr_commands lists commands that will be executed automatically when a PR is opened.
- The
[pr_reviewer] section contains the configurations for the review tool you want to edit (if any).
Incremental Mode
Incremental review only considers changes since the last Code Review Agent review. This can be useful when working on the PR in an iterative manner, and you want to focus on the changes since the last review instead of reviewing the entire PR again.
For invoking the incremental mode, the following command can be used:
Note that the incremental mode is only available for GitHub.
 {width=512}
PR Reflection
By invoking:
The tool will first ask the author questions about the PR, and will guide the review based on their answers.
Configuration options
!!! example “General options”
| num_code_suggestions |
Number of code suggestions provided by the 'review' tool. For manual comments, default is 4. For Code Review Agent app auto tools, default is 0, meaning no code suggestions will be provided by the review tool, unless you manually edit pr_commands. |
| inline_code_comments |
If set to true, the tool will publish the code suggestions as comments on the code diff. Default is false. |
| persistent_comment |
If set to true, the review comment will be persistent, meaning that every new review request will edit the previous one. Default is true. |
| extra_instructions |
Optional extra instructions to the tool. For example: "focus on the changes in the file X. Ignore change in ...". |
| enable_help_text |
If set to true, the tool will display a help text in the comment. Default is true. |
!!! example “Enable\disable specific sub-sections”
| require_score_review |
If set to true, the tool will add a section that scores the PR. Default is false. |
| require_tests_review |
If set to true, the tool will add a section that checks if the PR contains tests. Default is true. |
| require_estimate_effort_to_review |
If set to true, the tool will add a section that estimates the effort needed to review the PR. Default is true. |
| require_can_be_split_review |
If set to true, the tool will add a section that checks if the PR contains several themes, and can be split into smaller PRs. Default is false. |
!!! example “SOC2 ticket compliance 💎”
This sub-tool checks if the PR description properly contains a ticket to a project management system (e.g., Jira, Asana, Trello, etc.), as required by SOC2 compliance. If not, it will add a label to the PR: “Missing SOC2 ticket”.
| require_soc2_ticket |
If set to true, the SOC2 ticket checker sub-tool will be enabled. Default is false. |
| soc2_ticket_prompt |
The prompt for the SOC2 ticket review. Default is: `Does the PR description include a link to ticket in a project management system (e.g., Jira, Asana, Trello, etc.) ?`. Edit this field if your compliance requirements are different. |
!!! example “Adding PR labels”
You can enable\disable the review tool to add specific labels to the PR:
| enable_review_labels_security |
If set to true, the tool will publish a 'possible security issue' label if it detects a security issue. Default is true. |
| enable_review_labels_effort |
If set to true, the tool will publish a 'Review effort [1-5]: x' label. Default is true. |
!!! example “Auto-approval”
If enabled, the review tool can approve a PR when a specific comment, /review auto_approve, is invoked.
| enable_auto_approval |
If set to true, the tool will approve the PR when invoked with the 'auto_approve' command. Default is false. This flag can be changed only from configuration file. |
| maximal_review_effort |
Maximal effort level for auto-approval. If the PR's estimated review effort is above this threshold, the auto-approval will not run. Default is 5. |
Usage Tips
!!! tip “General guidelines”
The `review` tool provides a collection of possible feedbacks about a PR.
It is recommended to review the [Configuration options](#configuration-options) section, and choose the relevant options for your use case.

Some of the features that are disabled by default are quite useful, and should be considered for enabling. For example:
`require_score_review`, `require_soc2_ticket`, and more.

On the other hand, if you find one of the enabled features to be irrelevant for your use case, disable it. No default configuration can fit all use cases.
!!! tip “Automation”
When you first install Code Review Agent app, the default mode for the review tool is:
pr_commands = ["/review --pr_reviewer.num_code_suggestions=0", ...]
Meaning the review tool will run automatically on every PR, without providing code suggestions.
Edit this field to enable/disable the tool, or to change the used configurations.
!!! tip “Code suggestions”
If you set `num_code_suggestions`>0 , the `review` tool will also provide code suggestions.

Notice If you are interested **only** in the code suggestions, it is recommended to use the [`improve`](./improve.md) feature instead, since it is a dedicated only to code suggestions, and usually gives better results.
Use the `review` tool if you want to get more comprehensive feedback, which includes code suggestions as well.
!!! tip “Possible labels from the review tool”
The `review` tool can auto-generate two specific types of labels for a PR:

- a `possible security issue` label that detects if a possible [security issue](settings/pr_reviewer_prompts.toml#L136) exists in the PR code (`enable_review_labels_security` flag)
- a `Review effort [1-5]: x` label, where x is the estimated effort to review the PR (`enable_review_labels_effort` flag)

Both modes are useful, and we recommended to enable them.
!!! tip “Extra instructions”
Extra instructions are important.
The `review` tool can be configured with extra instructions, which can be used to guide the model to a feedback tailored to the needs of your project.

Be specific, clear, and concise in the instructions. With extra instructions, you are the prompter. Specify the relevant sub-tool, and the relevant aspects of the PR that you want to emphasize.

Examples for extra instructions:
```
[pr_reviewer]
extra_instructions="""\
In the code feedback section, emphasize the following:
- Does the code logic cover relevant edge cases?
- Is the code logic clear and easy to understand?
- Is the code logic efficient?
...
"""
```
Use triple quotes to write multi-line instructions. Use bullet points to make the instructions more readable.
!!! tip “Auto-approval”
Code Review Agent can approve a PR when a specific comment is invoked.

To ensure safety, the auto-approval feature is disabled by default. To enable auto-approval, you need to actively set in a pre-defined configuration file the following:
```
[pr_reviewer]
enable_auto_approval = true
```
(this specific flag cannot be set with a command line argument, only in the configuration file, committed to the repository)


After enabling, by commenting on a PR:
```
/review auto_approve
```
Code Review Agent will automatically approve the PR, and add a comment with the approval.


You can also enable auto-approval only if the PR meets certain requirements, such as that the `estimated_review_effort` label is equal or below a certain threshold, by adjusting the flag:
```
[pr_reviewer]
maximal_review_effort = 5
```
5.2.3 -
Overview
The ask tool answers questions about the PR, based on the PR code changes. Make sure to be specific and clear in your questions.
It can be invoked manually by commenting on any PR:
Example usage
 {width=512}
 {width=512}
Note that the tool does not have “memory” of previous questions, and answers each question independently.
5.2.4 -
Overview
The update_changelog tool automatically updates the CHANGELOG.md file with the PR changes.
It can be invoked manually by commenting on any PR:
Example usage
 {width=768}
 {width=768}
Configuration options
Under the section pr_update_changelog, the configuration file contains options to customize the ‘update changelog’ tool:
push_changelog_changes: whether to push the changes to CHANGELOG.md, or just print them. Default is false (print only).extra_instructions: Optional extra instructions to the tool. For example: “focus on the changes in the file X. Ignore change in …
5.2.5 -
Overview
The improve tool scans the PR code changes, and automatically generates suggestions for improving the PR code.
The tool can be triggered automatically every time a new PR is opened, or it can be invoked manually by commenting on any PR:
Example usage
Manual triggering
Invoke the tool manually by commenting /improve on any PR. The code suggestions by default are presented as a single comment:
![code suggestions as comment]code_suggestions_as_comment.png){width=512}
To edit configurations related to the improve tool, use the following template:
/improve --pr_code_suggestions.some_config1=... --pr_code_suggestions.some_config2=...
For example, you can choose to present the suggestions as commitable code comments, by running the following command:
/improve --pr_code_suggestions.commitable_code_suggestions=true
 {width=512}
Note that a single comment has a significantly smaller PR footprint. We recommend this mode for most cases.
Also note that collapsible are not supported in Bitbucket. Hence, the suggestions are presented there as code comments.
Automatic triggering
To run the improve automatically when a PR is opened, define in a configuration file:
[github_app]
pr_commands = [
    "/improve",
    ...
]

[pr_code_suggestions]
num_code_suggestions_per_chunk = ...
...
- The
pr_commands lists commands that will be executed automatically when a PR is opened.
- The
[pr_code_suggestions] section contains the configurations for the improve tool you want to edit (if any)
Extended mode
An extended mode, which does not involve PR Compression and provides more comprehensive suggestions, can be invoked by commenting on any PR by setting:
[pr_code_suggestions]
auto_extended_mode=true
(This mode is true by default).
Note that the extended mode divides the PR code changes into chunks, up to the token limits, where each chunk is handled separately (might use multiple calls to GPT-4 for large PRs).
Hence, the total number of suggestions is proportional to the number of chunks, i.e., the size of the PR.
Configuration options
!!! example “General options”
| num_code_suggestions |
Number of code suggestions provided by the 'improve' tool. Default is 4 for CLI, 0 for auto tools. |
| extra_instructions |
Optional extra instructions to the tool. For example: "focus on the changes in the file X. Ignore change in ...". |
| rank_suggestions |
If set to true, the tool will rank the suggestions, based on importance. Default is false. |
| commitable_code_suggestions |
If set to true, the tool will display the suggestions as commitable code comments. Default is false. |
| persistent_comment |
If set to true, the improve comment will be persistent, meaning that every new improve request will edit the previous one. Default is false. |
| self_reflect_on_suggestions |
If set to true, the improve tool will calculate an importance score for each suggestion [1-10], and sort the suggestion labels group based on this score. Default is true. |
| suggestions_score_threshold |
Any suggestion with importance score less than this threshold will be removed. Default is 0. Highly recommend not to set this value above 7-8, since above it may clip relevant suggestions that can be useful. |
| enable_help_text |
If set to true, the tool will display a help text in the comment. Default is true. |
!!! example “params for ’extended’ mode”
| auto_extended_mode |
Enable extended mode automatically (no need for the --extended option). Default is true. |
| num_code_suggestions_per_chunk |
Number of code suggestions provided by the 'improve' tool, per chunk. Default is 5. |
| rank_extended_suggestions |
If set to true, the tool will rank the suggestions, based on importance. Default is true. |
| max_number_of_calls |
Maximum number of chunks. Default is 5. |
| final_clip_factor |
Factor to remove suggestions with low confidence. Default is 0.9. |
Usage Tips
!!! tip “Extra instructions”
Extra instructions are very important for the `imrpove` tool, since they enable you to guide the model to suggestions that are more relevant to the specific needs of the project.

Be specific, clear, and concise in the instructions. With extra instructions, you are the prompter. Specify relevant aspects that you want the model to focus on.

Examples for extra instructions:
```
[pr_code_suggestions] # /improve #
extra_instructions="""\
Emphasize the following aspects:
- Does the code logic cover relevant edge cases?
- Is the code logic clear and easy to understand?
- Is the code logic efficient?
...
"""
```
Use triple quotes to write multi-line instructions. Use bullet points to make the instructions more readable.
!!! tip “Review vs. Improve tools comparison”
- The [review](./review.md) tool includes a section called 'Possible issues', that also provide feedback on the PR Code.
In this section, the model is instructed to focus **only** on [major bugs and issues](settings/pr_reviewer_prompts.toml#L71).
- The `improve` tool, on the other hand, has a broader mandate, and in addition to bugs and issues, it can also give suggestions for improving code quality and making the code more efficient, readable, and maintainable (see [here](pr_code_suggestions_prompts.toml#L34)).
- Hence, if you are interested only in feedback about clear bugs, the `review` tool might suffice. If you want a more detailed feedback, including broader suggestions for improving the PR code, also enable the `improve` tool to run on each PR.
5.2.6 -
Overview
The help tool provides a list of all the available tools and their descriptions.
For Code Review Agent Pro users, it also enables to trigger each tool by checking the relevant box.
It can be invoked manually by commenting on any PR:
Example usage
An example result:
 {width=750}
→
 {width=750}
6 - SmartAnswer 企业知识库
SmartAnswer 企业知识库为企业用户提供了智能知识库服务,支持自动索引文件、信息管理系统,比如:Jira, Confluence, GitHub Issue 等内容,自动构建向量化知识库,提供智能搜索、智能问答等功能,帮助企业用户快速构建知识库,提升知识管理效率。


